How to Use Yoast SEO: Complete Beginner’s Guide (2027)
Learn how to install and configure Yoast SEO, choose WordPress SEO settings, optimize a post, and check sitemaps, schema and search visibility.
On this page
This Yoast SEO tutorial for beginners shows you how to use Yoast SEO step by step: check your existing WordPress setup, install the plugin, configure the website, then optimize an article. Each important setting is explained alongside its purpose and a practical starting choice.
Yoast SEO is a WordPress SEO plugin that supports both website configuration and page optimization. Its technical settings help search engines discover and interpret the site; its on-page tools help you review titles, descriptions, headings, links and readability. This guide separates those tasks so you can finish setup before concentrating on content.
Our examples draw on testing Yoast SEO Free 28.7 in October 2026. The core walkthrough uses Free; paid features are identified where relevant. For a purchase evaluation, see our Yoast SEO review. If the wider subject is new to you, our What Is SEO? guide explains crawling, indexing and ranking.
As an example, consider a physiotherapist’s website. The physiotherapist writes about treatments, qualifications, clinic location, appointments and patient questions. Yoast helps organize and present that material through content feedback, search metadata and structured data. The owner supplies the useful information and decides which recommendations improve it.
Part I — Install Yoast and Complete Essential Setup
1. Check Your Existing SEO Plugin and Prepare
Choose the correct starting route
Open “WordPress Dashboard” → “Plugins” → “Installed Plugins.” Look for Rank Math, All in One SEO, The SEO Framework or another general-purpose SEO plugin.
If none is active and the site has no previous SEO information to preserve, continue to installation. If another plugin is active, use the migration guidance below. If an alternative is installed but inactive, check whether it holds titles, descriptions or other information you still need before treating this as a fresh setup.
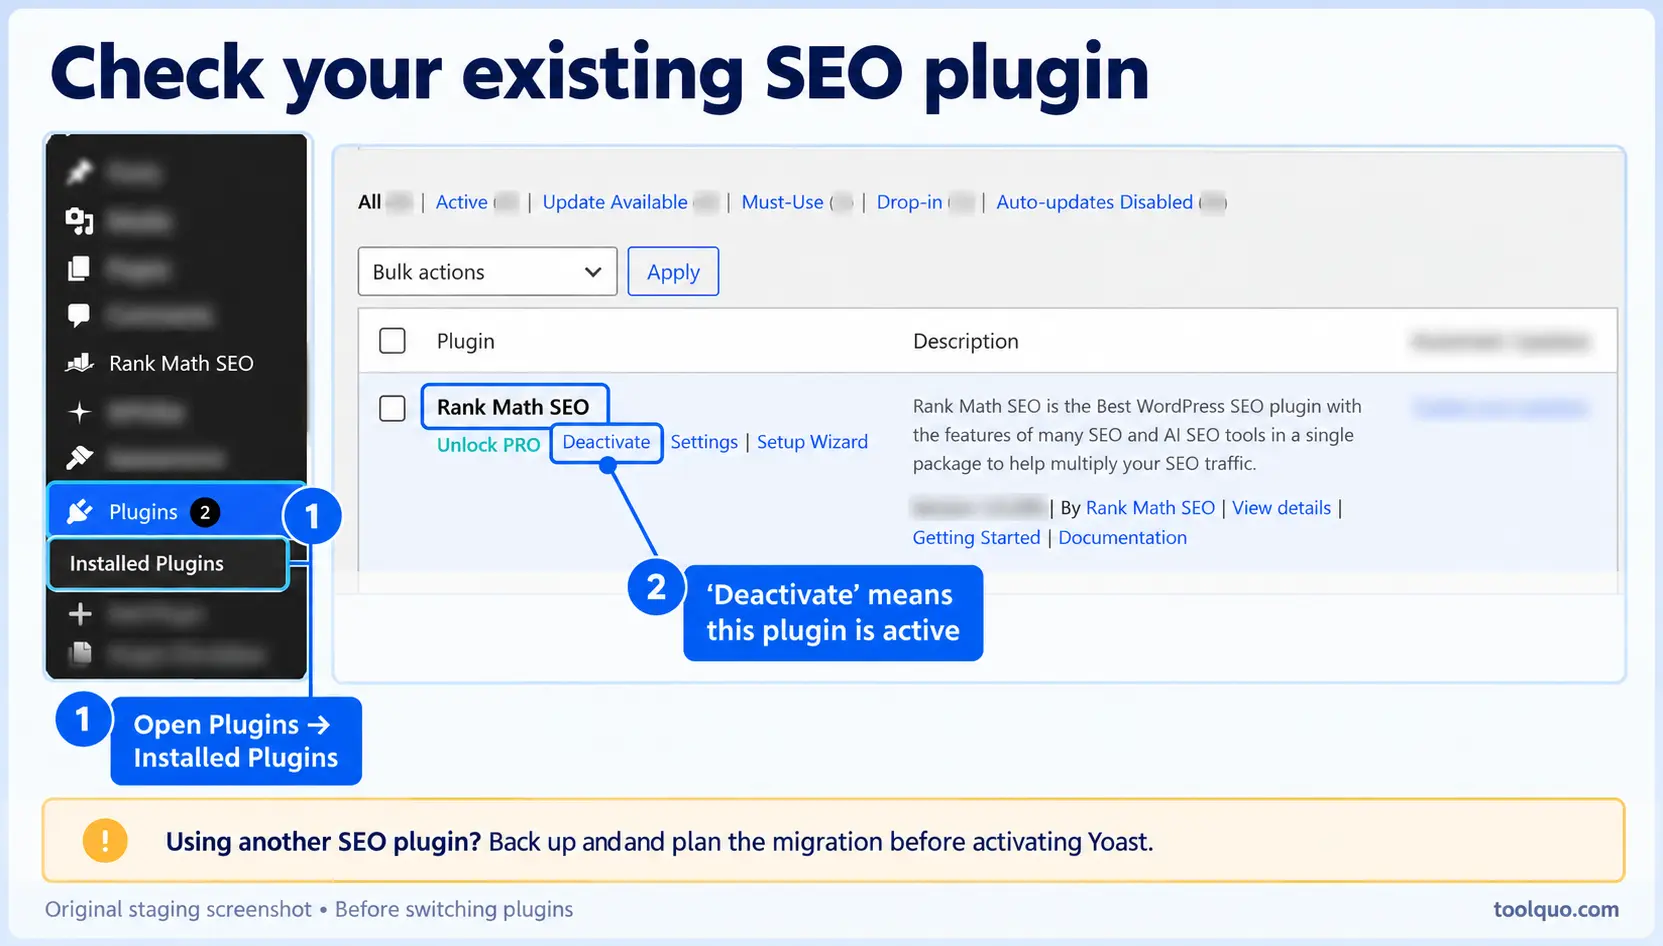
Back up and migrate an established site
Before replacing a plugin, take a restorable backup of the website files and database. Your host’s backup tool may provide this; confirm that you know how to restore it. Record a few important URLs and their existing search titles, descriptions and any required redirects so you can compare the result.
- Review Yoast’s migration instructions for the plugin you are replacing. Keep its stored data available until the import has been checked.
- Deactivate the previous general-purpose SEO plugin, then install and activate Yoast.
- Open “Yoast SEO” → “Tools” → “Import and Export.” Use the supported import option for the previous plugin.
- Check representative posts, pages and archives, plus old URLs that rely on redirects. Confirm whether any required settings or capabilities failed to transfer.
- If everything you rely on transferred correctly, no recreation is needed. Otherwise configure the missing items before removing the previous plugin’s data.
Importing titles and descriptions does not establish that every specialist feature moved across. For example, custom schema or redirect rules can need separate attention. Yoast provides migration guidance for Rank Math; follow the instructions relevant to your starting plugin.
For an existing website, an optional staging website is a separate testing copy. A bakery could test the switch at staging.example.com while customers continue using example.com. Ask your host for its Staging or Clone website tool. Protect the copy with the host’s password controls, and select WordPress “Settings” → “Reading” → “Discourage search engines from indexing this site.” This helps keep unfinished duplicates out of search and away from customers. Rehearse the switch there before applying the checked configuration publicly.
If you are still deciding which plugin to use, compare their capabilities before choosing. Avoid running two general-purpose SEO plugins on a live site. Readers keeping their existing plugin can use our Rank Math tutorial.
2. How to Install Yoast SEO in WordPress
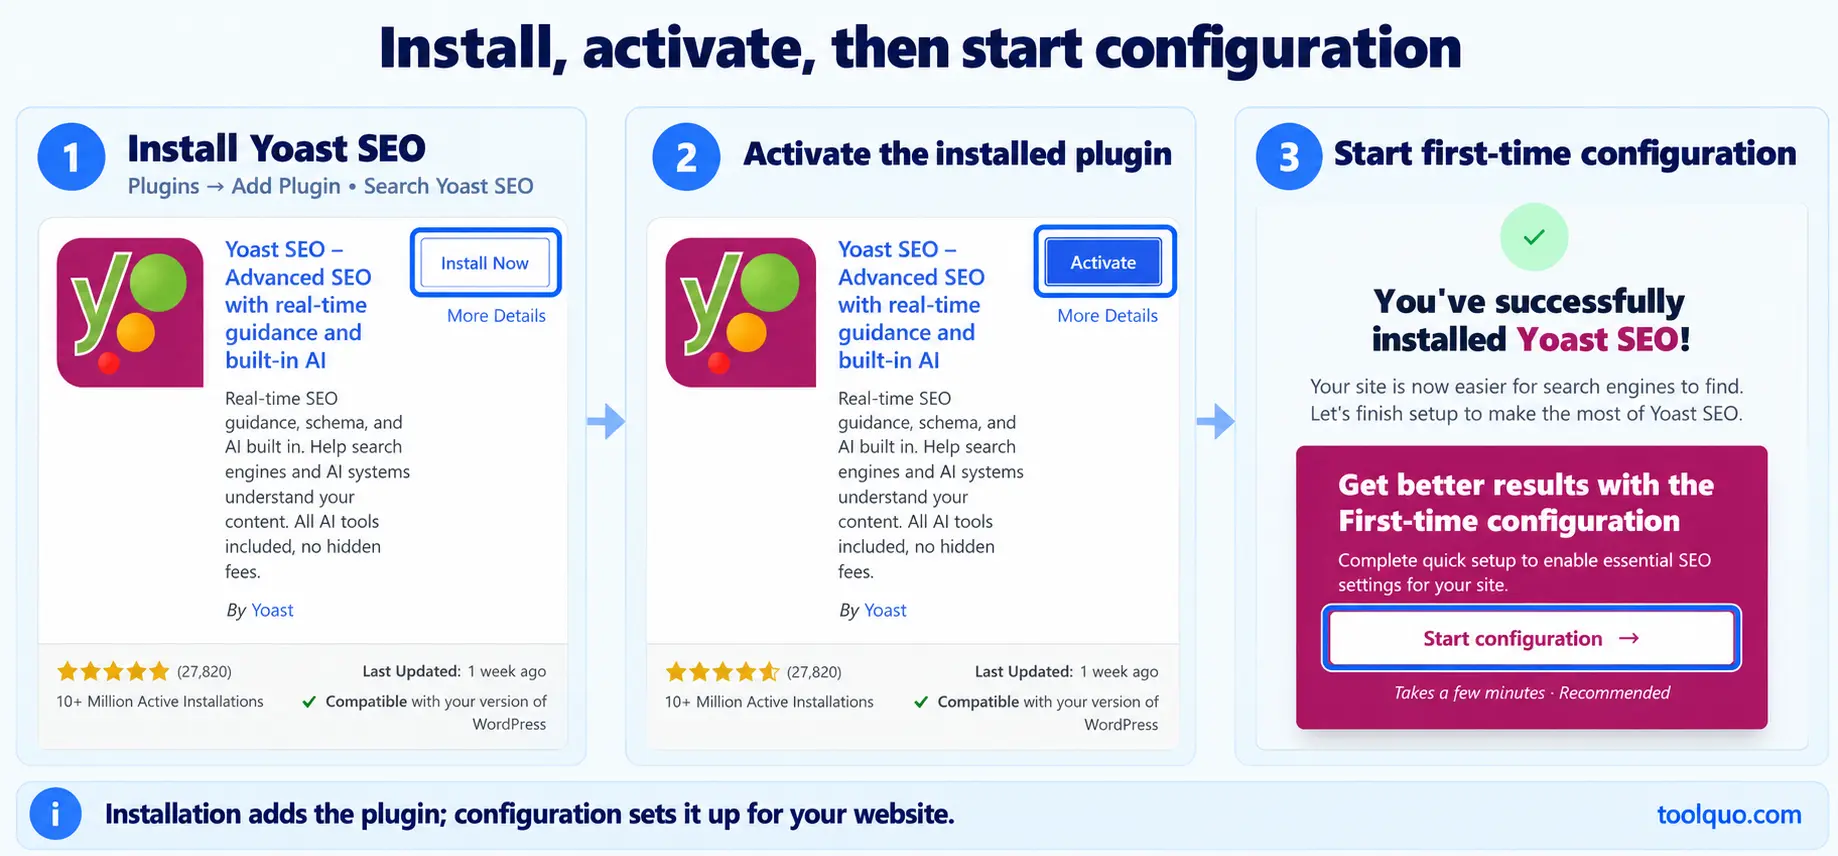
- Open “Plugins” → “Add New” (labelled “Add Plugin” in some WordPress versions) in the WordPress dashboard.
- Search for “Yoast SEO.” Select “Yoast SEO – Advanced SEO with real-time guidance and built-in AI” by “Yoast.”
- Click “Install Now,” wait for installation, then click “Activate.”
- Find “Yoast SEO” in the dashboard’s left menu. On Installed Plugins, “Deactivate” indicates that it is active.
- Use the welcome screen’s “Start configuration” or “Start first-time configuration” action, depending on your version, or open the configuration manually as described below.
If Yoast is already active, skip installation. Installing plugins requires suitable WordPress permissions, usually an Administrator account on a standard site; a multisite network may reserve it for a network administrator. If “Add New” or “Install Now” is missing, ask the administrator to check your permissions or hosting restrictions.
You can return to setup later through “Yoast SEO” → “General” → “First-time configuration.” Use that route if the welcome screen does not open automatically or you close it to finish another task. Installation and configuration are separate stages; returning to configuration does not require reinstalling.
3. How to Set Up Yoast SEO: First-Time Configuration
Prepare Yoast’s SEO data
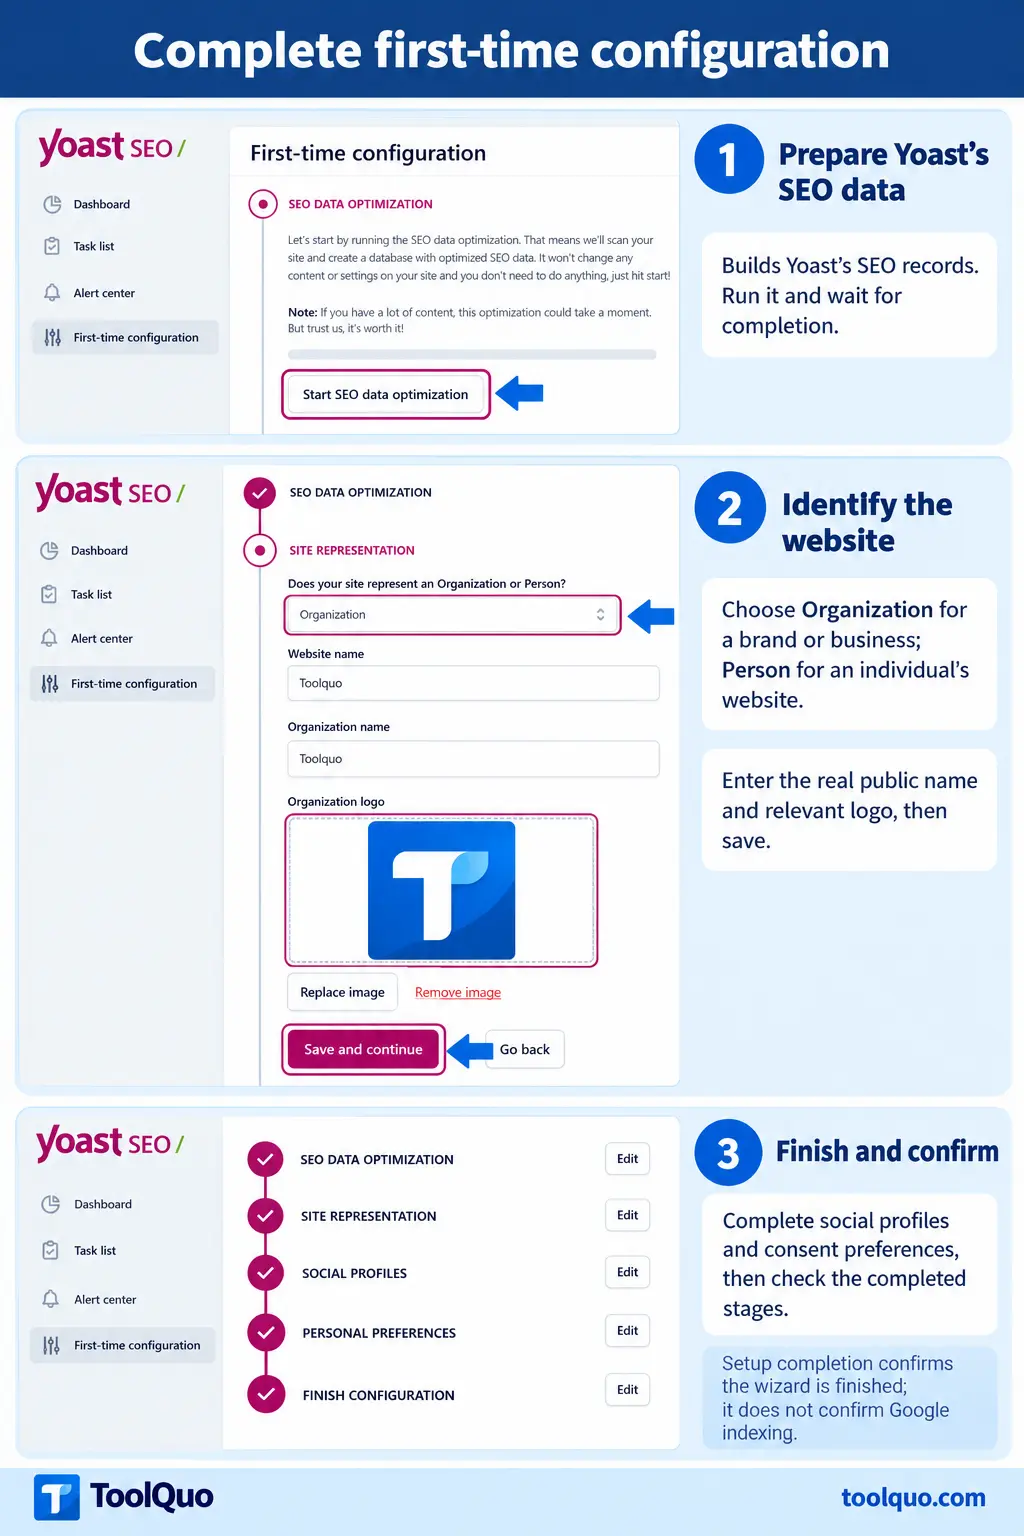
Open “Yoast SEO” → “General” → “First-time configuration.” At the SEO data optimization step, click “Start SEO data optimization” and wait for completion. After optimization finishes, click “Continue.” Later configuration stages use “Save and continue.”
The Yoast SEO plugin prepares its own organized records of pages and SEO information, helping it retrieve metadata efficiently and support features that need an overview of the site. A large library can take longer. If interrupted, return to configuration to check its status; “Yoast SEO” → “Tools” → “Optimize SEO data” can also provide the preparation tool.
Choose the entity your website represents
“Site representation” identifies the organization or person behind the website. Choose “Organization” for a business, brand, institute or publication. Enter its real public name and relevant logo. Choose “Person” when the website represents an individual, then select the appropriate WordPress user and check their public identity details.
These are general guidelines, not rigid rules. A named writer’s personal travel blog will usually use Person; a coaching institute or software-review brand will usually use Organization, even if one person currently writes everything. Base the choice on the public identity, not the author count.
Enter the actual name. “Best Cheap SEO Agency Chicago” belongs in the organization field only if that is genuinely the business’s name. Use a recognizable logo or personal image as requested; check that it remains identifiable at a small size.
Add profiles and choose preferences
Enter full URLs for social profiles belonging to the selected person or organization. These help connect its public identities in structured data. Leave a field empty if there is no corresponding profile.
Choose whether to share the plugin-use information described in the usage-tracking prompt. Enable it if you consent, or leave it disabled if you prefer not to share it. Review optional communications separately, then finish configuration.
If you entered the wrong entity, name or image, correct it through “Yoast SEO” → “Settings” → “Site representation” and click “Save changes.” Readers whose details are correct can leave them unchanged. There is no need to restart the whole setup to correct a field.
4. Yoast SEO Settings: Navigation and Site Basics
Use this compact navigation map
Quotation marks identify interface labels. Follow the arrows through the menus. General website settings establish common defaults; individual editor controls configure the post or page currently open.
|
You want to… |
Open… |
What belongs there |
|---|---|---|
|
Return to setup or read a notice |
“Yoast SEO” → “General” |
“First-time configuration,” “Dashboard,” “Task list” and “Alert center.” Read the actual issue before acting. |
|
Configure website defaults |
“Yoast SEO” → “Settings” |
“General” settings, “Content types,” “Categories & tags” and “Advanced.” The following sections show the specific paths. |
|
Optimize one item |
“Posts” or “Pages” → edit the item → Yoast panel |
Keyphrase, SEO/readability feedback, search appearance, schema and individual advanced controls. |
|
Edit many descriptions or import data |
“Yoast SEO” → “Tools” |
“Bulk editor” or “Import and Export,” according to the task. |
|
Connect an external service |
“Yoast SEO” → “Integrations” |
Supported connections; use one only when you need its task and understand its account requirements. |
To open Yoast in the block editor, click its icon near the top-right, or use the Yoast metabox below the content. For example, configure a common post-title format in Settings, then write a more specific search title in one article’s editor. The latter affects that article rather than every post.
Configure “Site basics”
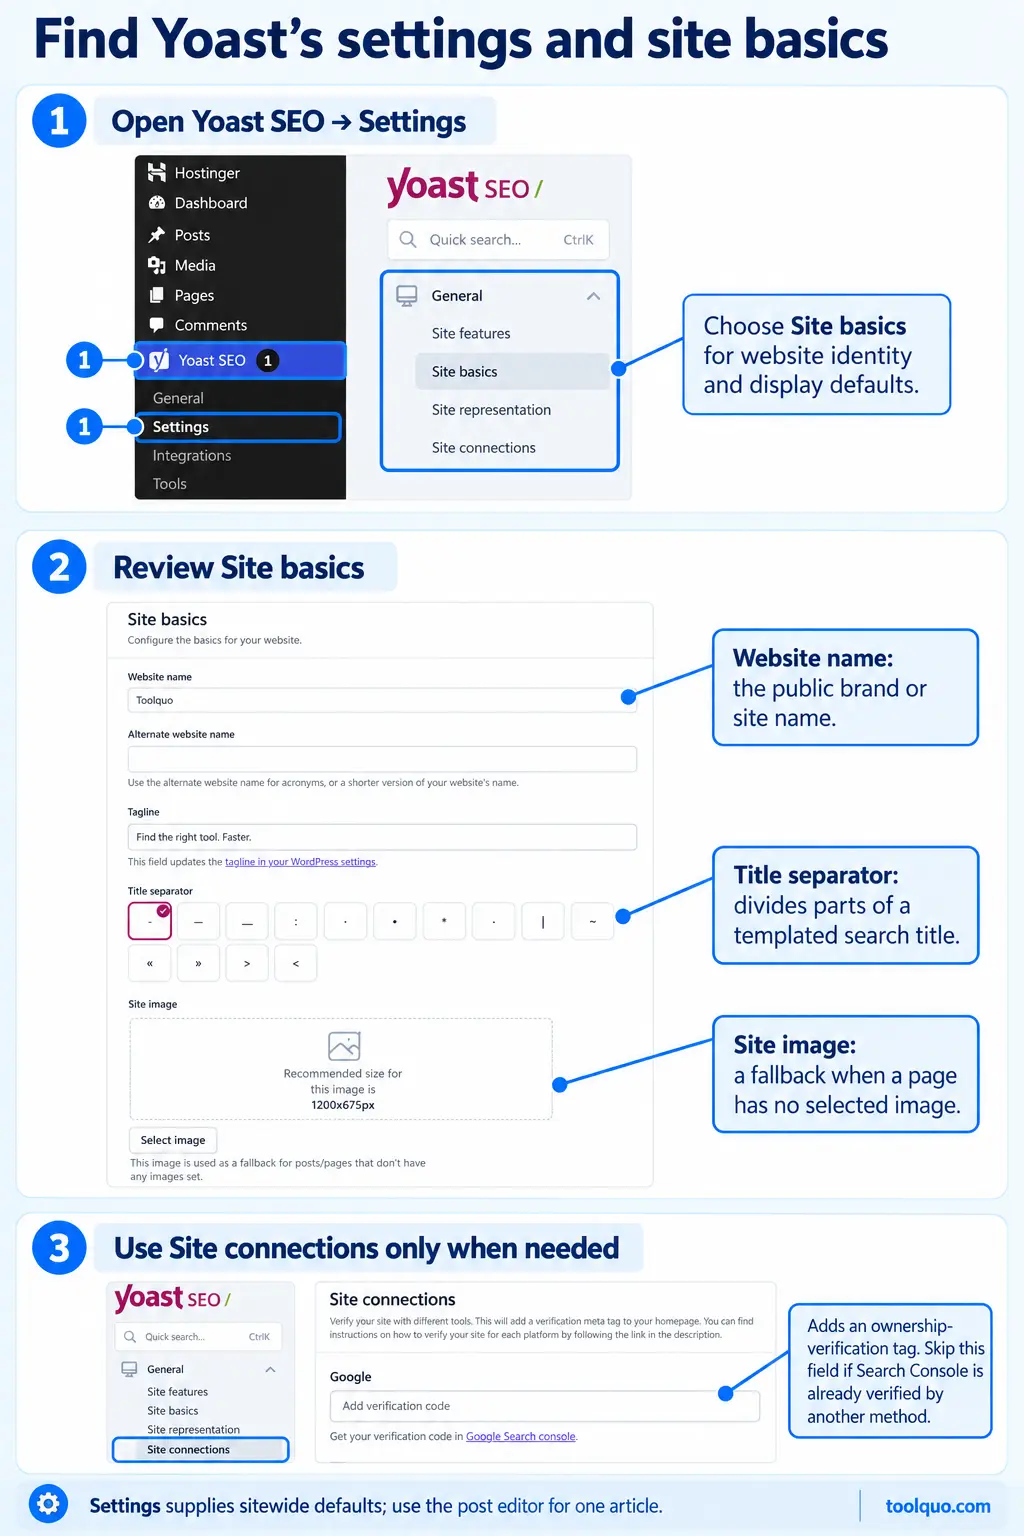
Open “Yoast SEO” → “Settings” → “Site basics.” “Site info” contains identity/display defaults; “Site preferences” contains selected access and data-sharing controls. Review the fields below and save appropriate values.
|
Actual field or control |
Purpose |
Practical choice |
|---|---|---|
|
“Website name” |
Supplies the public name used in applicable metadata/templates. |
Enter the recognized site or brand name, such as Green Corner. |
|
“Alternate website name” |
Provides a genuine shorter name or abbreviation. |
Use an established alternative if one exists; otherwise leave empty. |
|
“Tagline” |
Briefly describes what the website offers. |
Use a meaningful description, such as Practical gardening advice for small spaces. |
|
“Title separator” |
Divides elements in a templated search title. |
Choose a short readable symbol. A vertical bar can produce Growing Basil | Green Corner. |
|
“Site image” |
Provides a branded fallback when a page lacks its own selected image. |
Upload a clear representative image. Prefer article-specific images for important content; the fallback is separate from the organization logo. |
|
“Restrict advanced settings for authors” |
Reserves sensitive Schema/Advanced controls for editors and administrators. |
Usually leave enabled. Disable only when trusted authors need those controls and understand indexing/canonical decisions. |
|
“Usage tracking” |
Shares the plugin-use information described by Yoast. |
Choose according to your consent preference. |
Click “Save changes.” Reopen the page to confirm the values persisted. Keep correct “Site representation” details from setup; change them only when the underlying identity needs correction. Paid policy controls, where offered, can remain unconfigured unless you maintain relevant policy pages.
Verify Search Console ownership when needed
“Yoast SEO” → “Settings” → “Site connections” contains verification-code fields for supported services. Ownership verification gives your account access to their site-owner tools. For Google Search Console, those include search performance and indexing information. Most beginners can start with Google and add another service when it is relevant.
- Open Google Search Console and add the public website as a property if it is not already verified.
- For a URL-prefix property using the HTML tag method, copy the token from the verification tag’s content value.
- Paste it into the Google field in “Site connections,” click “Save changes,” then return to Search Console and click “Verify.”
- Keep the successful verification method in place. If the property is already verified through DNS or another valid method, skip the Yoast field.
A Domain property requires DNS verification through the domain/DNS provider instead of this HTML-tag route. Verification provides access to Search Console itself; open that service to see the reports. Google Analytics measures visits and behavior through a separate installation.
Part II — Technical SEO: Configure the Website
5. Check Public Search Visibility and Individual Exceptions
Confirm the public website can be indexed
Indexing means adding a page to a search engine’s searchable collection. A noindex instruction asks a supporting search engine to exclude it. Allowing indexing makes a page eligible; Google still decides whether to include and display it.
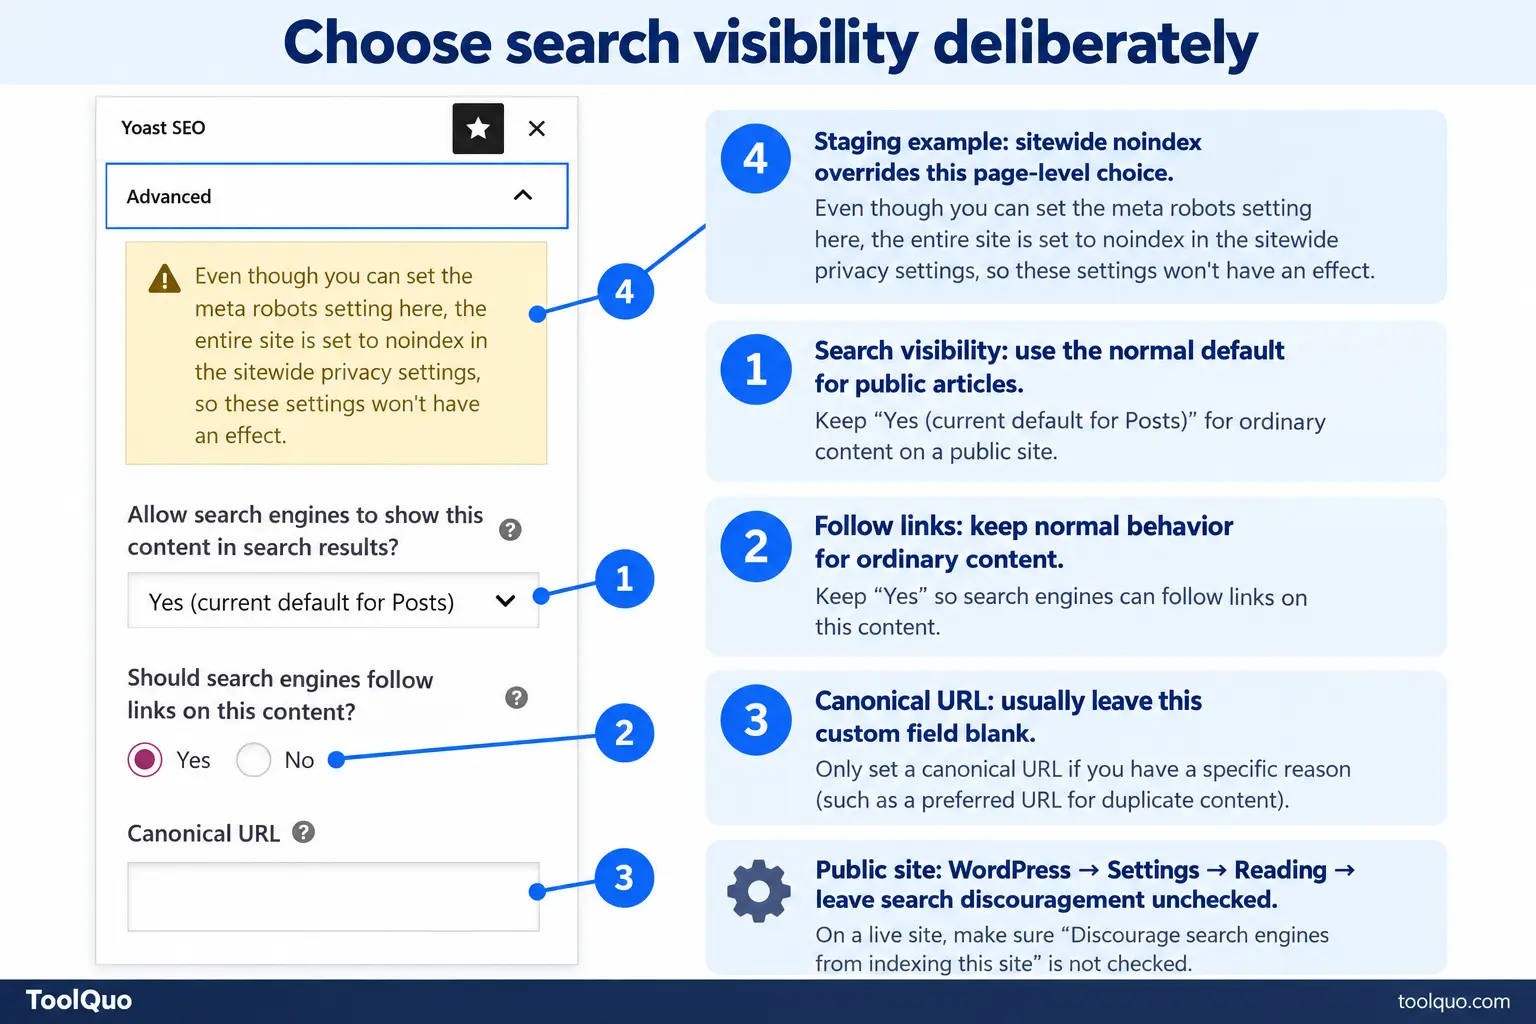
Open WordPress “Settings” → “Reading” and find “Discourage search engines from indexing this site.” For a public website you want people to find on Google, leave this box unchecked. If it is currently checked, remove the tick and click “Save Changes.”
Selecting the box asks search engines to exclude the whole website. Use that only in an exceptional situation, such as deliberately keeping an unfinished site out of search before launch. It is not the normal configuration for a public blog or business website.
The checkbox supplies a search-exclusion request; password protection separately controls who can view a website. Confirm the intended public pages open while you are logged out. If a launch-time password wall remains accidentally active, correct that through the host or access-control system.
Next, open “Yoast SEO” → “Settings” → “Site features.” Keep “XML sitemaps” and “Schema Framework” enabled when you use Yoast for these tasks. They do different jobs: the sitemap lists eligible page addresses for search engines to discover; schema supplies organized descriptions of the page, website and publisher.
Choose one general-purpose SEO plugin to manage this output. For example, if you choose Yoast, deactivate Rank Math rather than leaving both active. The aim is to avoid two plugins publishing competing versions of the same SEO information. Sections 7–8 explain how to check Yoast’s schema and sitemap.
Use page-level controls only for a reason
Open a post or page → Yoast panel → “Advanced.” The search-visibility question applies to that individual item. Keep the appropriate default for a normal public article; select No only when you deliberately want this URL excluded, then save.
For example, a newsletter signup form might send visitors to a “Thank you for subscribing” page. You may want subscribers to see it after signing up, while keeping it out of Google because it offers little value as a search result. Open that page’s Yoast “Advanced” panel, select No for the search-visibility question and save.
Keep normal public articles and service pages eligible for search. Changing the thank-you page affects that one item; switching off visibility for the entire Pages content type would affect all pages in that group.
Keep normal follow behavior for ordinary articles. Follow/nofollow concerns link treatment; index/noindex concerns the page’s own inclusion in search. If one paid link needs a sponsored relationship, apply the appropriate attribute to that link through WordPress’s link controls rather than changing the entire page.
Leave automatic canonicals alone
A canonical URL identifies the preferred version of substantially duplicate content. A clean product address may be preferred over alternative parameterized versions. Yoast normally generates a canonical automatically; an empty custom Canonical URL field can mean it is using that automatic value.
For a typical beginner, leave this field blank. Use an override only for a deliberate duplicate-content arrangement you understand. Do not point unrelated articles to the homepage or change the value to another page simply because you want that page to rank.
You can verify a public page through Search Console’s URL inspection, which distinguishes indexed information from a live test. If a result is unexpected, use Section 17. Advanced robots-file editing and raw-header inspection are outside this beginner workflow.
6. Decide Which Posts, Pages and Content Lists Should Appear in Search
First, choose the normal rule for Posts and Pages
WordPress usually separates blog articles, called Posts, from standalone Pages such as About, Contact and Services. Yoast’s “Content types” settings let you choose a common SEO rule for each group, so you do not need to configure every article individually.
For example, on a cooking website, the recipes published as blog posts belong to Posts, while its About page belongs to Pages. You will normally want both groups to be eligible for search. A plugin may add another group, such as Products for a shop; review that group only if it exists on your website.
- Open “Yoast SEO” → “Settings” → “Content types” → “Posts.”
- Under “Search appearance,” keep the option to show posts in search results enabled. This makes public posts eligible for indexing and the relevant sitemap; Google still decides what it includes.
- Keep “Enable SEO controls and assessments” enabled so you can use the Yoast sidebar or metabox while editing posts. This controls the editing tools, rather than search visibility.
- Leave the normal schema defaults in place for ordinary blog articles. Section 7 explains how schema describes the content.
- Click “Save changes,” then open “Content types” → “Pages” and review the same choices for your public pages.
For most blogs and business websites, allowing public Posts and Pages is the right starting point. If only one page needs exclusion, use the individual setting from Section 5. Do not exclude the whole group to hide a single thank-you page. Title and description defaults come later in Section 10.
Then review the extra lists created by categories and tags
Categories and tags organize posts. A category is a broad subject, such as Breakfast or Desserts on a cooking blog. A tag can describe a shared characteristic, such as Quick recipes. WordPress can create a separate page listing every post assigned to one category or tag. This list page is called an archive.
A Breakfast archive could show all breakfast recipes, with links to each one. A visitor might find it useful when choosing what to cook. A tag used on only one recipe may create a second page pointing to that same recipe, without offering much extra help.
Your decision here is whether these list pages should be search destinations of their own. A clear, useful recipe collection may deserve a Google listing. A thin or repetitive list may still help visitors browse your site, while being excluded from search.
- Open “Yoast SEO” → “Settings” → “Categories & tags” → “Categories.”
- Keep the search-visibility option enabled if your category pages form useful topic collections. Open an actual category page first to judge what a visitor would see.
- Review “Tags” separately. If you do not maintain useful tag collections, you can switch off their search visibility while keeping tags available for navigation.
- Click “Save changes.” Keep the Yoast editing controls enabled if you want to customize the search details of individual categories or tags.
Switching off archive search visibility applies noindex: the list remains available to visitors, but supporting search engines are asked to exclude it. It does not delete the recipes or remove the category/tag from WordPress.
To improve one category, open “Posts” → “Categories,” select it and click “Edit.” Give it a clear name and a helpful description, review its available Yoast fields, then save. Open the archive to check the result; the theme determines where the description is displayed.
Keep established category and tag URLs unless you have a reason to change them. Deleting a term or changing its slug affects the destination itself; that is a separate action from choosing whether Google should index the list.

Configure author and date archives
An author archive collects one writer’s articles. On a single-author blog, it may substantially repeat the main listing. On a multi-author publication, it can help readers find a specialist’s work.
Open “Yoast SEO” → “Settings” → “Advanced” → “Author archives.” “Enable author archives” determines whether they remain available. The separate search-visibility choice determines whether retained archives should be eligible for search.
In our test, disabling author archives caused the author URL to redirect to the homepage. After saving, click an author-name link on a post and check its destination. If you need a biography page, provide a deliberate profile destination rather than relying on a disabled archive.
For useful retained author pages, check public names and biographies through “Users” → “All Users” → “Edit,” subject to permissions. Keep empty-author archives excluded unless there is a particular reason to make them search destinations.
|
Website or archive |
Starting choice |
Why / when to choose differently |
|---|---|---|
|
Single-author blog |
Usually disable a redundant author archive. |
Retain it if readers use a useful author collection; assess search visibility separately. |
|
Multi-author publication |
Keep meaningful author archives; consider indexing substantial profiles. |
Review empty, duplicate or unhelpful author pages individually. |
|
Categories and tags |
Index useful, maintained topic collections. |
Noindex thin or overlapping collections still needed for navigation. Avoid blanket rules for all tags. |
|
Date archives |
Usually disable on an evergreen advice site. |
Keep chronological browsing when readers need it, such as historical news coverage; assess indexing separately. |
|
Format archives |
Leave disabled if post formats are unused or redundant. |
Retain only purposefully organized collections, such as useful gallery/video archives. |
Date archives list articles from a particular month or year. A news site may need that chronological browsing; a recipe blog usually benefits more from subject categories. Format archives group WordPress formats, such as galleries or videos, if your theme uses them.
For these controls, open “Yoast SEO” → “Settings” → “Advanced” → “Date archives” or “Format archives.” Retain only the lists that serve a purpose on your site, using the table above as a starting guide. Save and open a representative archive URL to confirm what visitors now reach.
If your site has a shop, review Products and product categories in the same way: ask what the public page contains and whether it should be discoverable. Store plugins can also supply product-specific information, so check their existing setup before adding another plugin for the same task. Yoast Free’s general settings do not include every specialist shop feature.
7. Yoast SEO Schema and Breadcrumbs: Essential Checks
Describe the page accurately
Schema markup is structured information that helps machines understand what a page describes and how it relates to its author, publisher and website. Yoast can generate these connected descriptions from the details you enter.
First confirm “Site representation” is accurate. Then review the schema defaults under “Settings” → “Content types” → “Posts” or “Pages.” In an individual editor, the Yoast “Schema” panel lets you select an appropriate Page type and Article type where applicable.
Retain accurate defaults for normal content. A specific About or Contact page can use an appropriate available subtype; ordinary evergreen advice should not be labelled NewsArticle merely because it was published recently. Save any justified individual selection.
Our inspected example contained seven connected objects: Article, WebPage, ImageObject, BreadcrumbList, WebSite, Organization and Person. Other pages can have a different valid combination. The useful check is whether the descriptions identify the actual page and entities correctly, not whether every page matches that count.
For a public URL, Google’s Rich Results Test can check the supported rich-result types it detects. Review reported errors and the actual page details. Passing a test establishes neither that every schema type is supported nor that an enhanced search display will appear. Use a specialist validator or developer review if your site needs deeper inspection.
A store or LMS may already supply product/course data. Identify the source before adding another implementation. General page settings alone do not prove complete specialist schema support. This is particularly important when several plugins can describe the same product, organization or course.
Add visible breadcrumbs only if useful
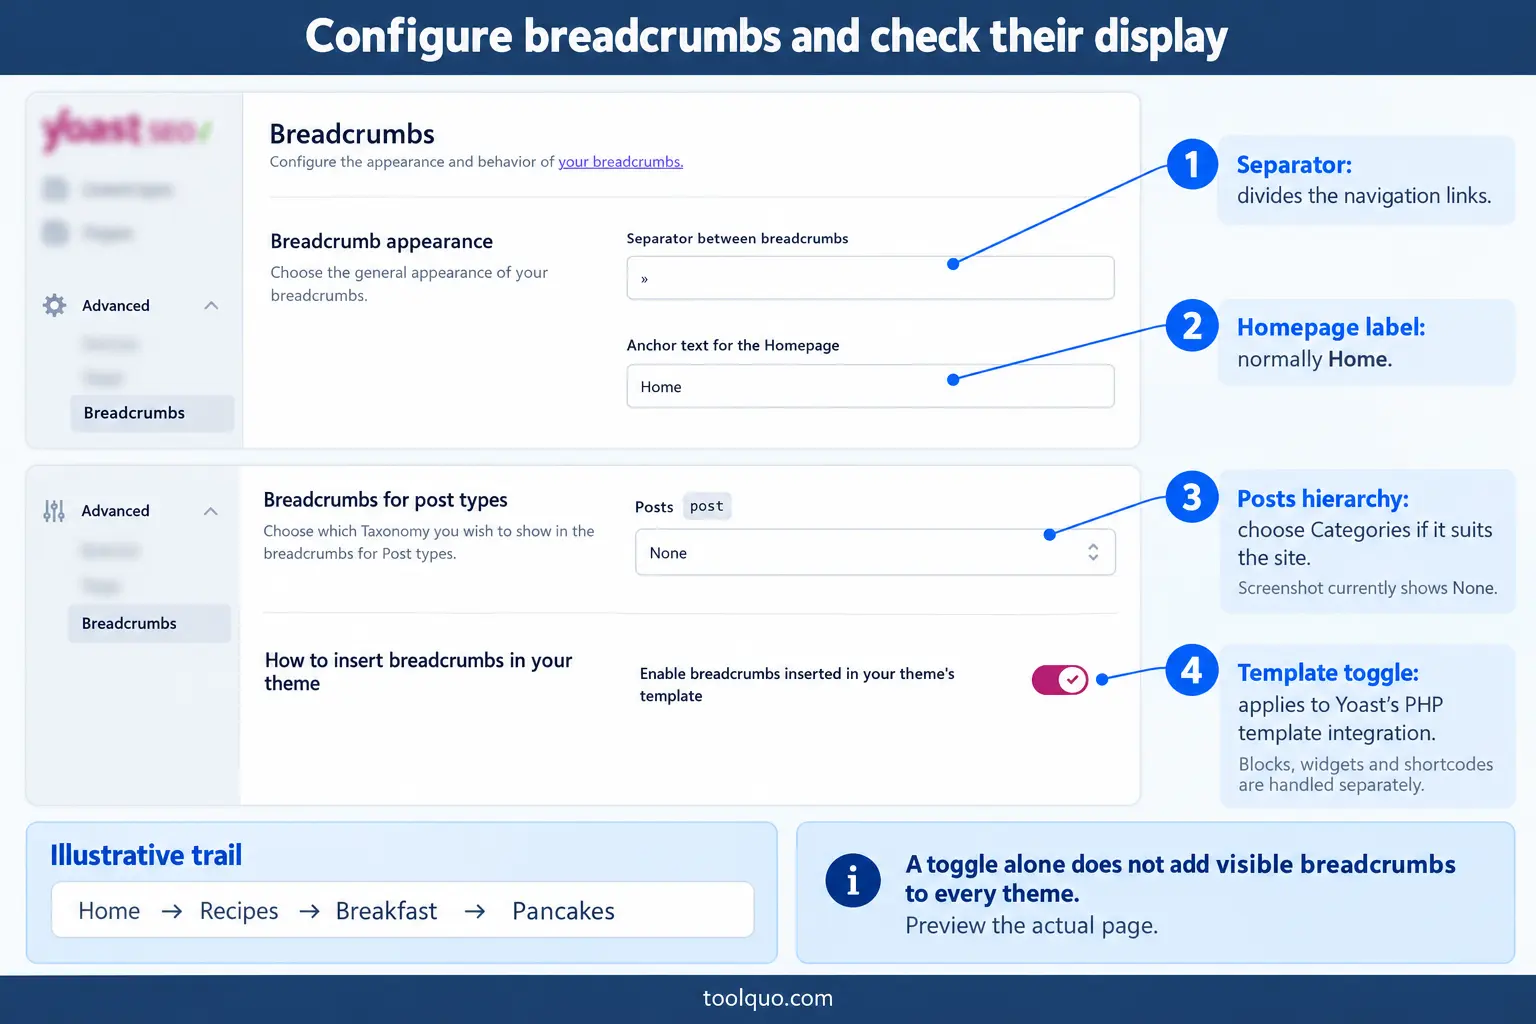
Breadcrumbs are a short row of navigation links showing where the current page sits, such as Home → Recipes → Breakfast → Pancakes. A reader on the pancake recipe can click Breakfast to browse similar recipes. Check whether your theme already displays a useful trail before adding another. The visible links and the structured data describing that trail are related but separate outputs.
Open “Yoast SEO” → “Settings” → “Advanced” → “Breadcrumbs.” Choose a readable separator and homepage label, usually Home. A subject-based blog can use Categories as the hierarchy for Posts. Leave optional prefix text empty unless the design needs it, then save.
Visible breadcrumbs also need a supported display implementation. Use the theme’s Yoast integration or the Yoast Breadcrumbs block where available. In a compatible block theme, placement can be managed in the appropriate template through “Appearance” → “Editor.” A toggle alone does not place the trail into every theme.
Preview the chosen implementation on a post and mobile layout. Confirm its links and avoid duplicate trails. We reviewed the settings without implementing theme-code integration, so our testing does not establish sitewide visible breadcrumb output. If your theme requires code and you do not need breadcrumbs now, continue with the suitable defaults rather than interrupting setup.
FAQ and How-to blocks are optional content tools, not required setup steps. Our tests generated their structured data, but Google has retired the corresponding FAQ and How-to rich results. Choose them only when the format helps readers; their full insertion procedures are outside this core walkthrough.
8. Yoast SEO Sitemap: Find, Check and Submit It
Open and understand the sitemap
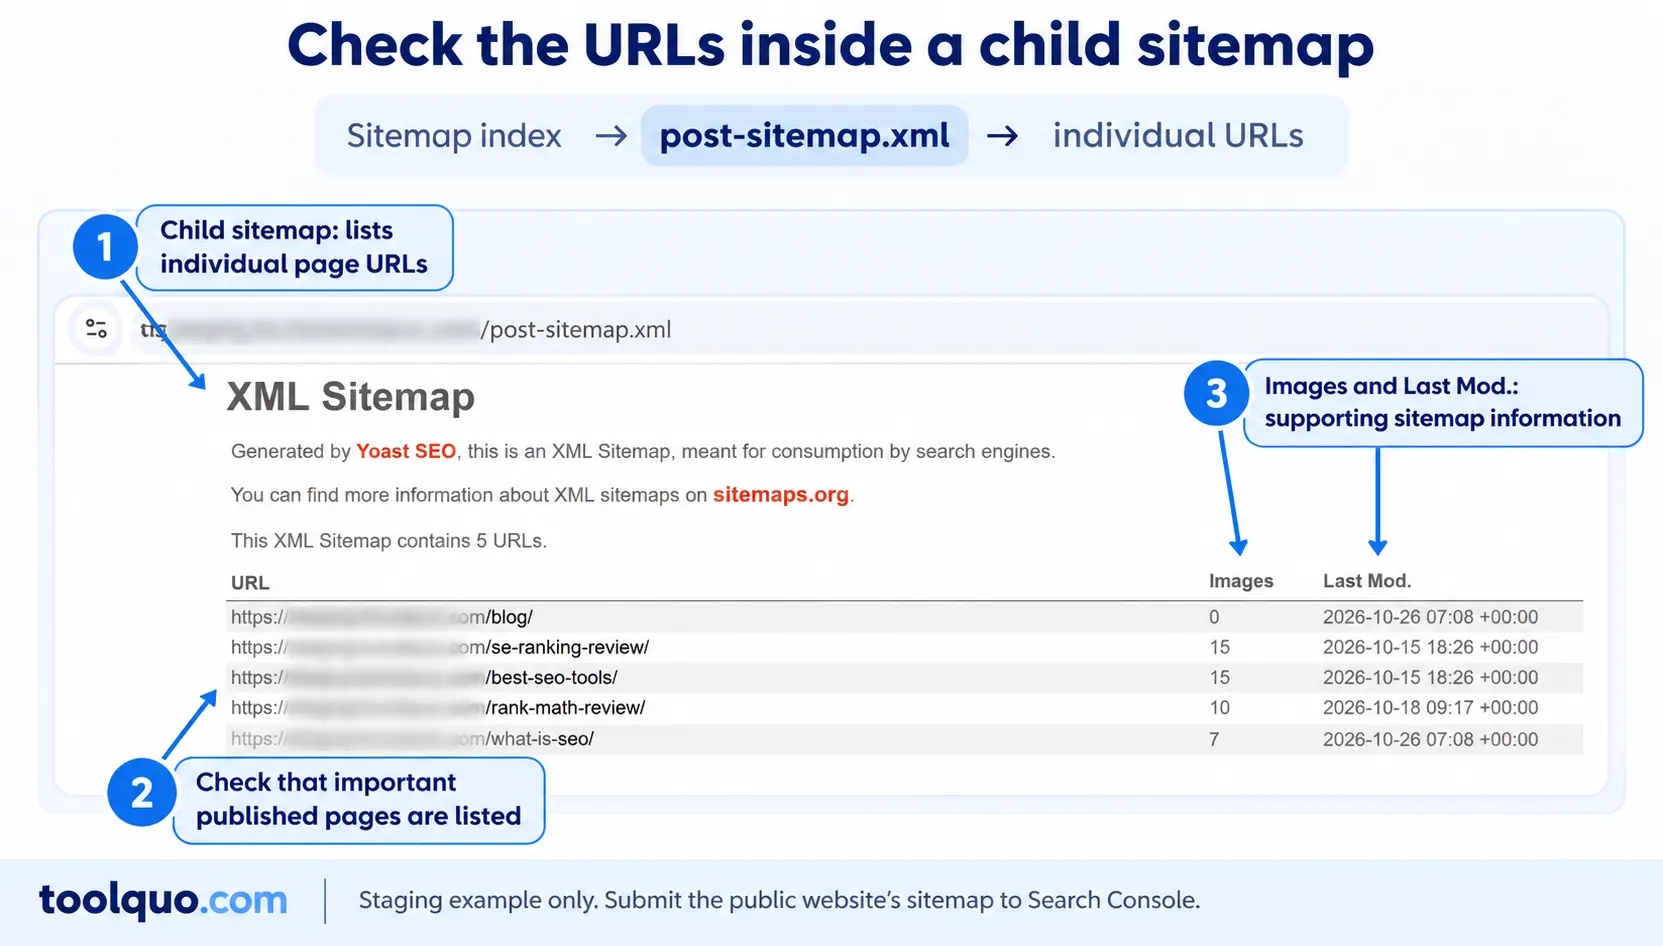
An XML sitemap lists URLs for search engines. A sitemap index links to child sitemaps, often organized by content type. This supports discovery, especially as a website grows; it is separate from a visitor-facing navigation menu.
- Open “Yoast SEO” → “Settings” → “Site features” and find “XML sitemaps.”
- Keep it enabled when Yoast handles your sitemap, then click “Save changes” if necessary.
- Click “View the XML sitemap,” or open your public domain followed by /sitemap_index.xml.
- Open the relevant child sitemap and check a few important published URLs.
Our test index linked to Posts, Pages and Categories sitemaps, with the expected posts in the inspected output. Your website may have product sitemaps or several numbered child files. Check the intended URLs rather than trying to reproduce our exact index.
A deliberately noindex page is normally excluded. If something is missing, first confirm that it is published and that you are checking the correct domain and child sitemap. Then review its content-type and individual visibility settings, redirects and intended canonical destination.
Submit the public sitemap
- Open Google Search Console and select the verified property for the public website.
- Open “Sitemaps.” Enter sitemap_index.xml or the full sitemap address, as required by the property’s form, and click “Submit.”
- Revisit its record to check whether Google fetched it and reported errors.
- Use URL inspection or the Page indexing report to investigate individual important URLs.
A successful fetch means Google could retrieve the sitemap. It does not establish that every listed page was indexed, and submission is not a ranking guarantee. Submit the public website’s sitemap, not a testing copy.
If the sitemap returns an error, confirm the feature is enabled and the exact address is correct. Test it without your login. Caching, redirects and security challenges can prevent an otherwise valid sitemap from being retrieved; investigate those specific causes rather than changing unrelated visibility settings.
Do not change your permalink structure to fix a sitemap problem. Where a rewrite refresh is appropriate, visiting WordPress “Settings” → “Permalinks” and saving without changing the structure can be a troubleshooting step. If the cause remains unclear, use the diagnostic table in Section 17.
9. Advanced WordPress SEO Settings: What to Leave Unchanged
Most beginners do not need a detailed crawl-cleanup exercise to finish Yoast setup. Under “Settings” → “Advanced,” concentrate on the purpose of a control and change it only when it solves an identified need.
|
Settings page |
Purpose |
Typical beginner choice |
|---|---|---|
|
“Media pages” |
Controls separate WordPress attachment pages surrounding uploaded media. |
Leave unnecessary media pages disabled on a typical blog/business site. A photography library may retain useful, descriptive attachment pages. |
|
“RSS” |
Adds selected material before/after feed items, such as attribution links. |
Retain useful default attribution. Customize only when your subscribers or publishing workflow need it. |
|
“Crawl optimization” |
Can remove selected generated metadata/feeds or clean up URL patterns. |
Retain defaults without an identified problem. Some controls are paid; avoid broad cleanup that can affect filters, tracking or feeds. |
Disabling media pages redirects attachment-page URLs to the media file itself according to Yoast’s documentation. Test an attachment-page address if you change this setting; opening only the image file does not test that redirect.
RSS feeds let people and applications receive new content. The default attribution can link a feed item to its original post and website. If you edit the before/after text, keep it short, save and check the feed. A feed you never read personally may still be used by a newsletter or subscriber.
Leave robots.txt and server-file editing outside this routine setup unless you are correcting a specific understood issue. The core work is choosing useful public content and appropriate visibility, not activating every advanced switch.
Part III — On-Page SEO: Optimize a Real Article
10. Enable Analysis and Set Useful Search Defaults
Turn on the editing tools you intend to use
Go to “Yoast SEO” → “Settings” → “Site features.” Keep “SEO analysis” and “Readability analysis” enabled when you want their editing feedback. “Insights” supplies information such as word count, reading time and Flesch reading ease; some insights require a paid plan. Save any changes.
These switches make the tools available. You still review the draft and decide what to improve. Additional inclusive-language feedback is optional. You can leave paid suggestions or AI tools unused while completing the Free workflow.
Configure the right homepage
Open WordPress “Settings” → “Reading” and identify the homepage arrangement. A latest-posts homepage displays a changing article list. A static homepage is a specific selected page, commonly used by businesses or coaching websites.
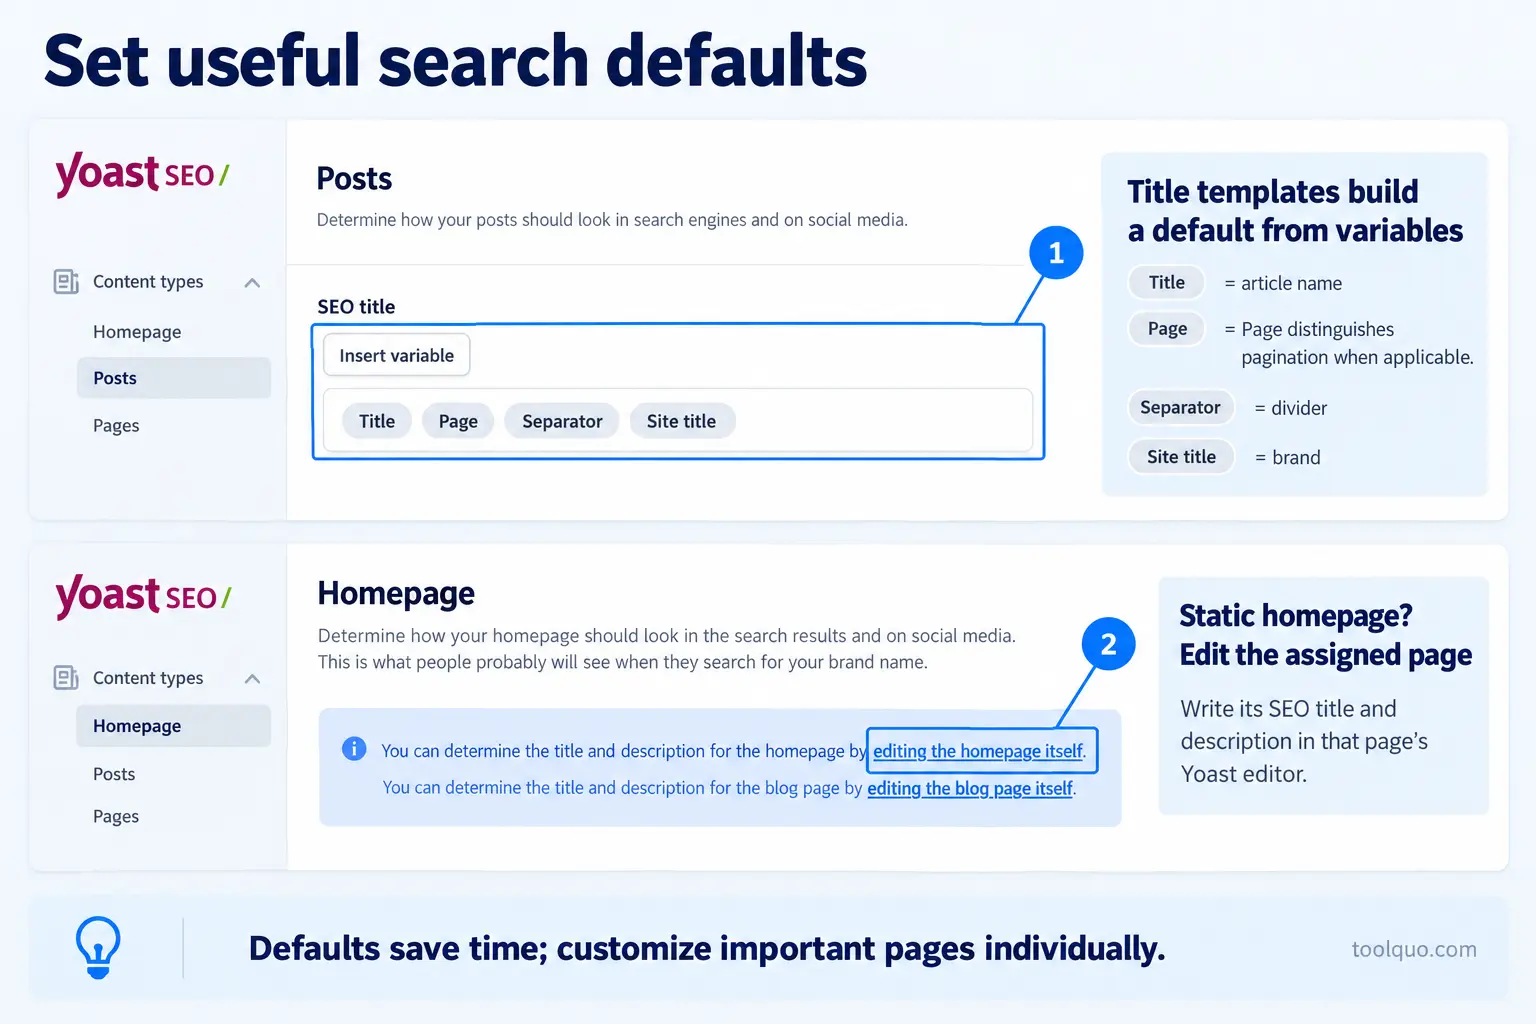
For a static homepage, open “Pages” → “All Pages,” edit the assigned page, then open Yoast’s “Search appearance.” Write that page’s title and description and click “Update.” The Homepage settings in Yoast may direct you to this editor.
For a latest-posts homepage, review “Yoast SEO” → “Settings” → “Content types” → “Homepage” and save the available search-appearance defaults. This route configures the main listing rather than a separately assigned static page.
Choose wording that explains what the visitor can find. “Green Corner | Practical Gardening Guides” communicates more than “Home.” A clinic can identify its treatment focus and location. Write for the actual offer, rather than listing every service and nearby city in one crowded line.
Set simple post and page templates
Open “Yoast SEO” → “Settings” → “Content types” → “Posts,” then review Pages. A title template builds a default using variables: placeholders replaced with the current article name, site name or other information.
A simple template can use Title, Page where applicable, Separator and Site title. Title supplies the article name; Page distinguishes paginated output when needed; Separator divides the elements; Site title adds the brand. Use the variable picker and keep an existing suitable pattern.
For example, a template can produce “How to Grow Basil | Green Corner.” Review the complete result on an article. If its custom search title already includes the brand, avoid appending it a second time.
Use description templates only when they produce an accurate summary for that content group. Otherwise prioritize individual descriptions for the homepage, principal service/course pages and important articles. Leaving a generic description empty is preferable to repeating the same unrelated promotional sentence across every page.
The content-type visibility and schema choices were addressed in Part II. You can now concentrate on how the page communicates its purpose, without repeatedly revisiting those technical defaults.
11. How to Use Yoast SEO to Optimize a Blog Post
Open a draft and choose a focus keyphrase
Follow this Yoast SEO optimization workflow with one real article. Open “Posts” → “All Posts” → “Edit,” or create a draft through “Posts” → “Add New.” Write the actual article first and save it. The example below uses ToolQuo’s What Is SEO? article.
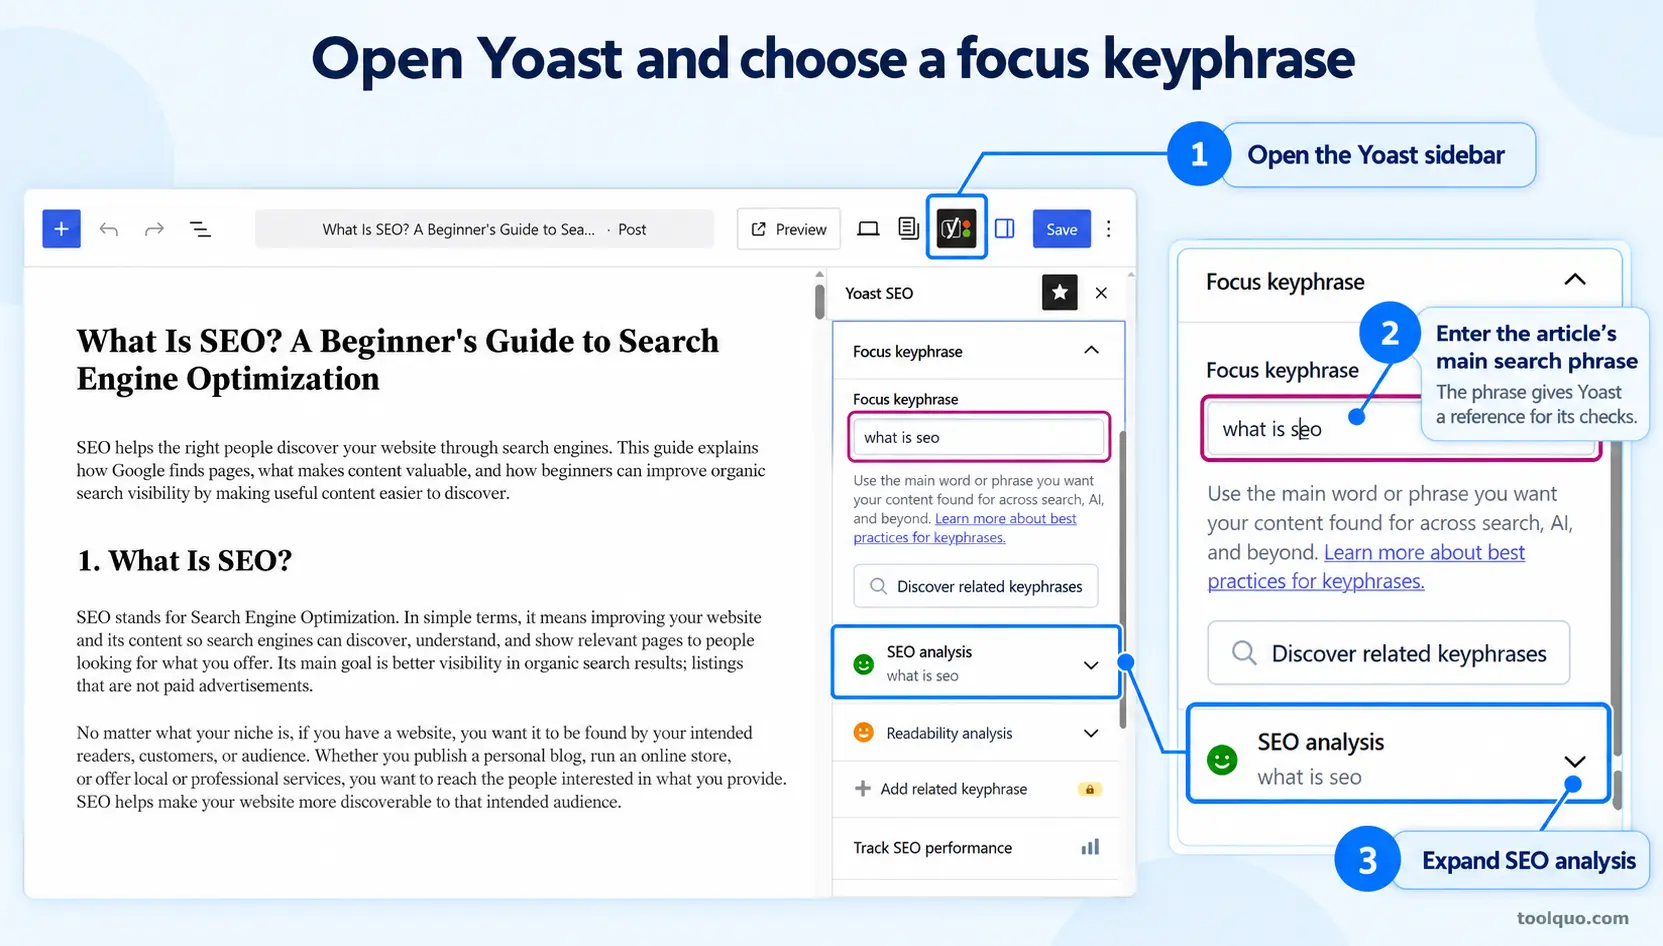
Open the Yoast editor sidebar through its icon near the top-right, or use the metabox below the content. Enter the principal search phrase in “Focus keyphrase,” then expand “SEO analysis.” In our test, we entered “what is seo.”
The focus keyphrase gives Yoast the reference for relevant checks. It helps you inspect whether the title, introduction and content communicate that topic. It is not a command sent to Google or a substitute for understanding what the searcher needs.
Choose a phrase matching the purpose of the page. A guide to choosing running shoes should answer that question; it should not target “buy running shoes” purely for search volume if it offers no purchasing destination. Secondary terms belong where they add useful explanation.
For our beginner SEO article, readers need the meaning of SEO, how search engines work and practical starting actions. A sentence repeating “what is seo” cannot replace those explanations. Use Yoast to check the presentation of a useful answer.
Write Your SEO Title and Meta Description in Yoast
|
Element |
What it is |
Where you normally work on it |
|---|---|---|
|
Visible post heading |
The main heading visitors read on the page, commonly its H1. |
The WordPress post-title field; themes/builders determine display. |
|
SEO title |
The HTML title supplied for browsers and search engines. |
Yoast’s “Search appearance” controls. |
|
Meta description |
A proposed short summary that search engines may use for a snippet. |
The description field in “Search appearance.” |
|
Slug |
The identifying part of the URL, such as what-is-seo. |
WordPress URL/permalink controls or the available Yoast preview controls. |
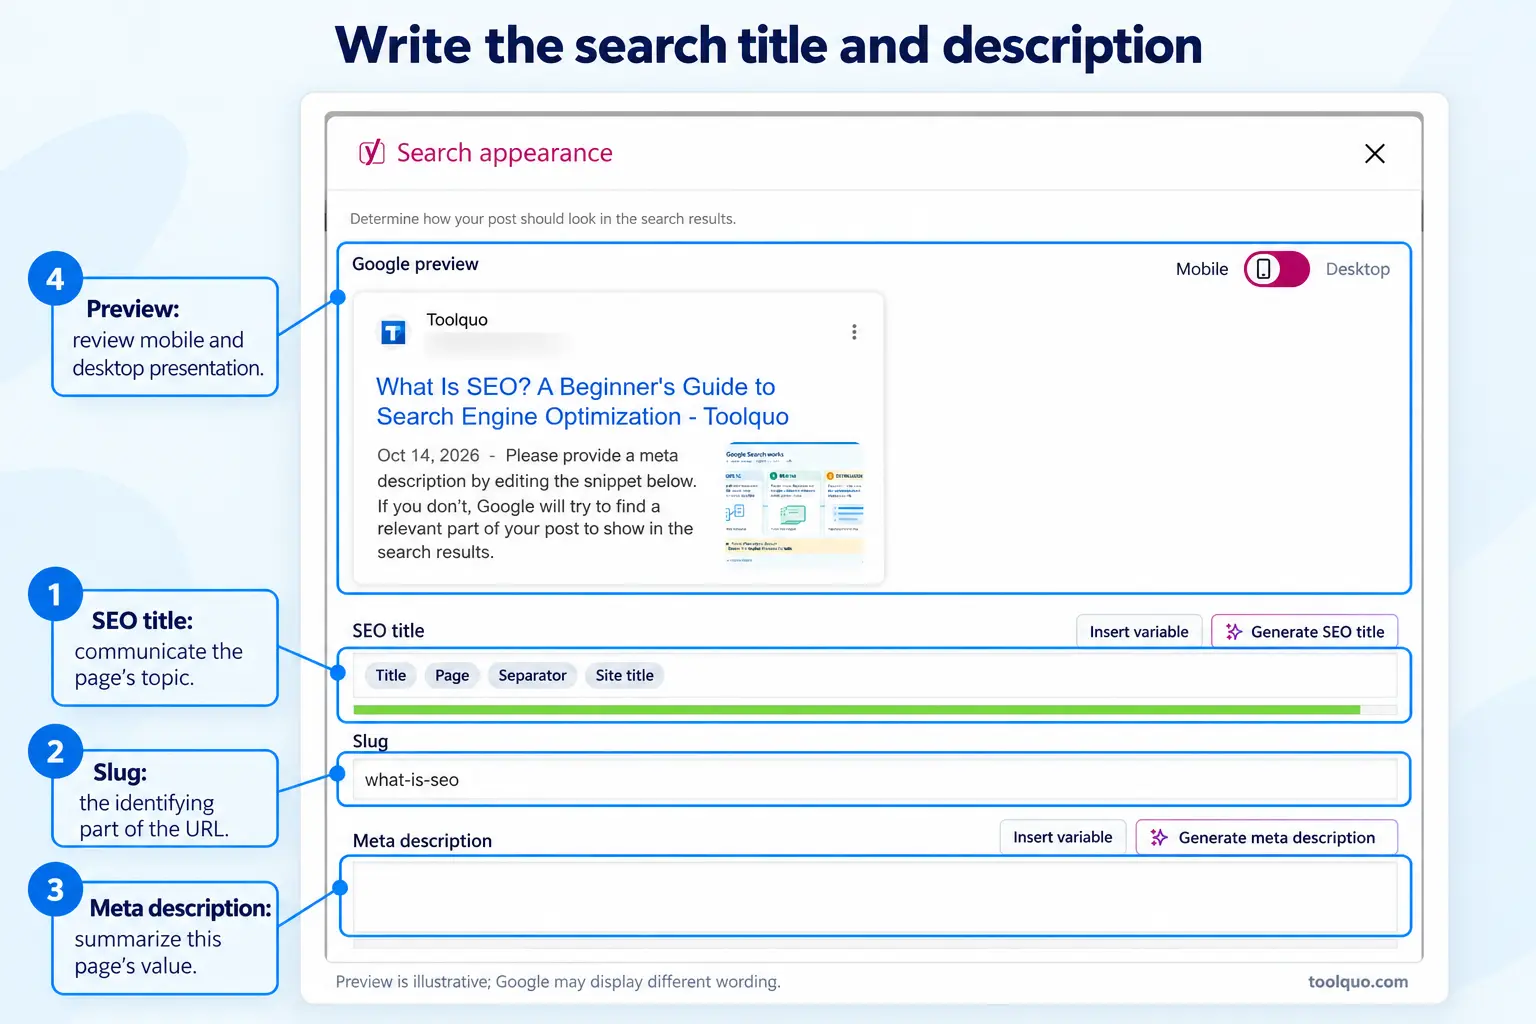
Open “Search appearance” or the search preview editor. In the SEO title field, state the topic and useful distinction clearly. For example, “What Is SEO? A Beginner’s Guide to Search Engine Optimization” identifies both the subject and audience.
The visible heading and SEO title may be similar without being identical. A shorter search title can communicate the same promise more efficiently; neither should promise a lesson, result or comparison the page does not deliver.
In Meta description, summarize the specific value. Suggested copy for the example could be: “Learn what SEO means, how search engines work, and practical steps beginners can take to improve a website’s visibility.” This is illustrative writing, rather than a claim to reproduce the exact test field.
A business page can explain a service, location and useful next action. A course page can explain its target exam, format and inclusions. Avoid a description that merely repeats the brand tagline and gives the searcher no reason to choose this particular page.
Use Yoast’s length bars to review likely display width and clarity. Put the important meaning early, remove repetition and retain useful specifics. A color is guidance; do not make the description inaccurate or awkward to satisfy it.
Check the slug and preview
For a new article, use a short, descriptive slug such as what-is-seo. Check it in the WordPress URL/permalink settings or the available Yoast preview controls. Keep the address understandable without trying to pack every related phrase into it.
For an already published article, leave a working URL unchanged unless there is a real reason to move it. A justified change needs an appropriate redirect from the old address and updated internal links. Yoast Free does not provide Premium’s redirect manager, so arrange the redirect through a suitable separate solution.
Switch between mobile and desktop previews where offered. Check that the title’s opening communicates the subject and the description reads as a complete promise. These previews illustrate possible presentation; Google may select another title link or snippet for a query.
Review the headings, links and images
Read the draft as a visitor would. Does the introduction answer the main question? Do the subheadings lead through a useful sequence? In our SEO example, separate explanations of crawling, indexing and ranking help a beginner follow the process.
Use keyphrase language naturally where it clarifies the topic. Do not place the exact phrase in every heading. A heading such as “Why a sitemap does not guarantee indexing” can be more useful than another generic repetition of the main keyword.
Add internal links when the reader needs a related explanation. A discussion of improving an individual page can lead naturally to our on-page SEO guide. Use descriptive anchor text identifying what the destination explains.
External links should substantiate a claim or help with the next task. Add an official reference because it supports an explanation, not simply because the plugin reports that no external link exists.
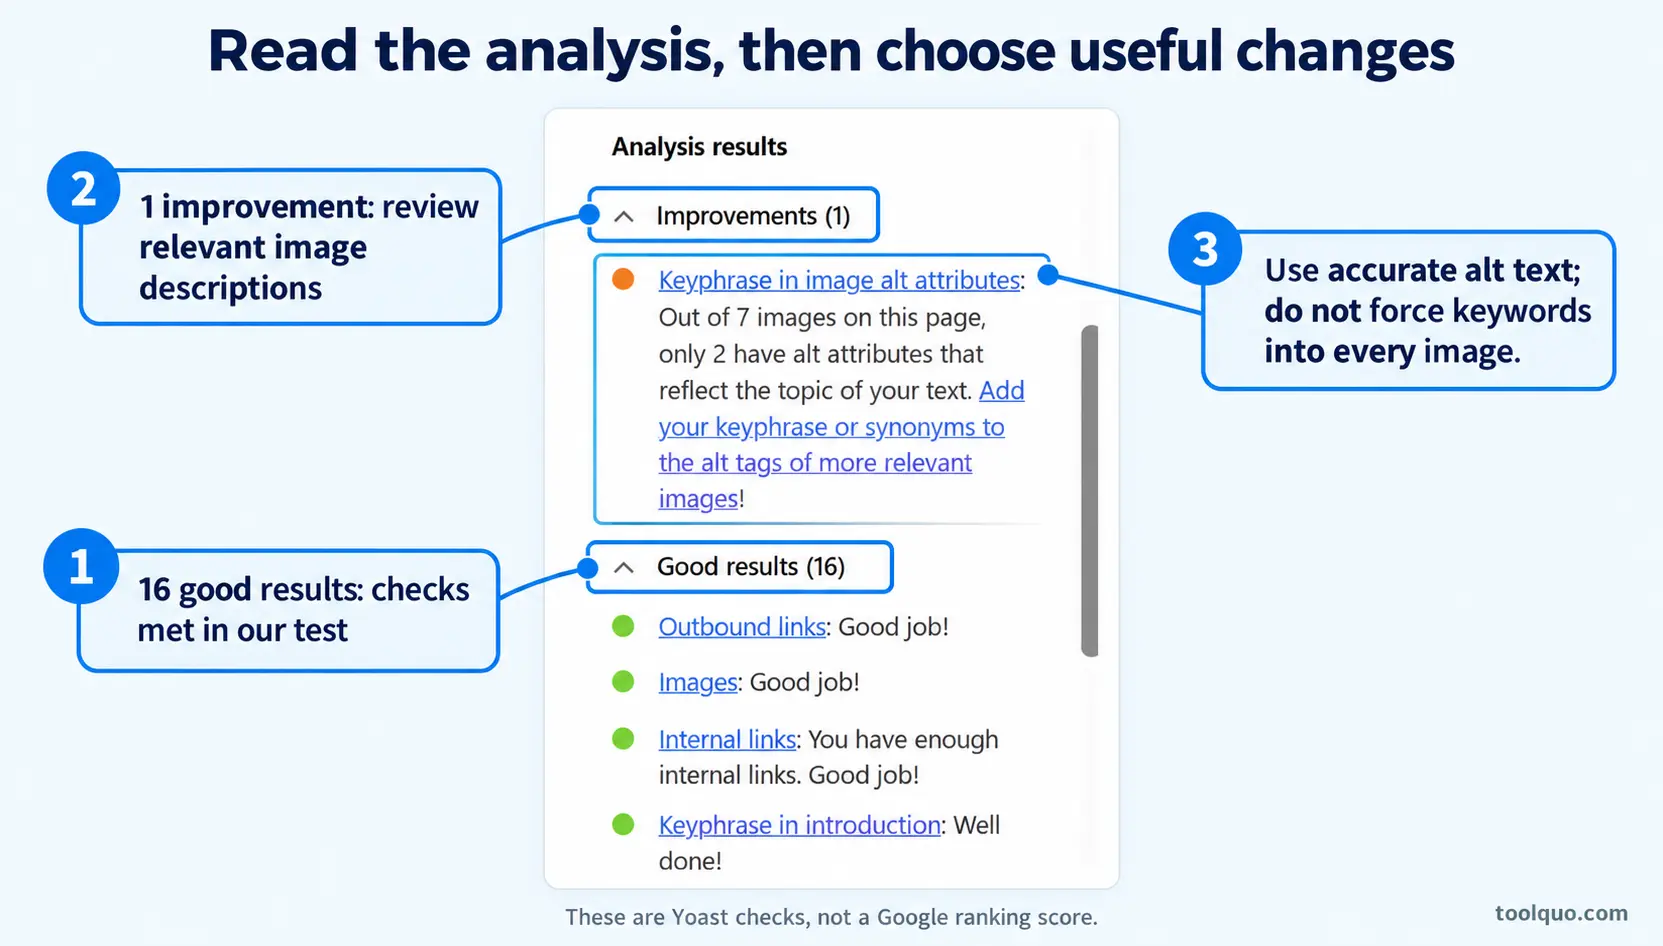
For an image, select its WordPress block and review Alternative text where available. Describe the relevant information conveyed. A chart needs an explanation of its message; a screenshot can identify the control being demonstrated. A genuinely decorative image can have empty alt text. Repeating the keyphrase in every image does not make the descriptions useful.
Understand the Yoast SEO Score and Our Test Result
What readers often call the Yoast SEO score is the plugin’s traffic-light summary of its assessments. Green means the content meets the applicable criteria; orange suggests improvement; red identifies a problem according to that check. Grey or unavailable analysis can reflect missing input or an assessment not available in that context.
For the calculation, annotated test screenshots and troubleshooting, see our guide to interpreting the Yoast SEO score.
In our What Is SEO? test, initial warnings appeared before a keyphrase was supplied. Entering “what is seo” made the assessment relevant to that phrase. After saving the meta description, the final analysis showed 16 good results and one suggested improvement relating to image alt attributes.
This was a result for that article, version and configuration. Entering a phrase can change the assessment of content already present; it does not demonstrate a Google ranking improvement. Similarly, saving a description completes a metadata task without establishing indexing.
Inspect each remaining issue rather than chasing the overall color. A keyword-density suggestion asks you to review topic language; it is not a reason to repeat the phrase mechanically. A short Contact page does not need to become an essay because an article-length check prefers more words.
Our Rank Math case study provides a related example of why plugin scores and content usefulness can move differently. The practical goal is a clearer, accurate page with suitable settings.
Save and confirm the result
- Address the specific suggestions that improve the page.
- Review Schema and Advanced only if this item needs an exception to the defaults already chosen.
- Click “Save draft,” “Save” or “Update,” as appropriate, and wait for confirmation.
- Use Preview for a draft; for a published page, open it while logged out and check the visible result.
- Reopen the editor to confirm important metadata persisted. Investigate a mismatch through Section 17 rather than making unrelated changes.
Saving a draft is sufficient for checking its editor fields and preview. It does not make the page publicly accessible to Google or a social-platform debugger. After publication, search engines and platforms may take time to process the changed output.
12. Use Yoast SEO’s Readability Analysis to Improve Your Writing
Review the actual passages
Open Yoast’s “Readability analysis” in the post editor. It flags writing patterns that can make a page difficult to read. Use the result to find passages worth revising, then judge the explanation against your audience.
A complex subject still needs precise terminology. The useful question is whether the reader can follow the meaning, not whether every sentence contains only short words. Explain unfamiliar concepts and use an example before removing a necessary term.
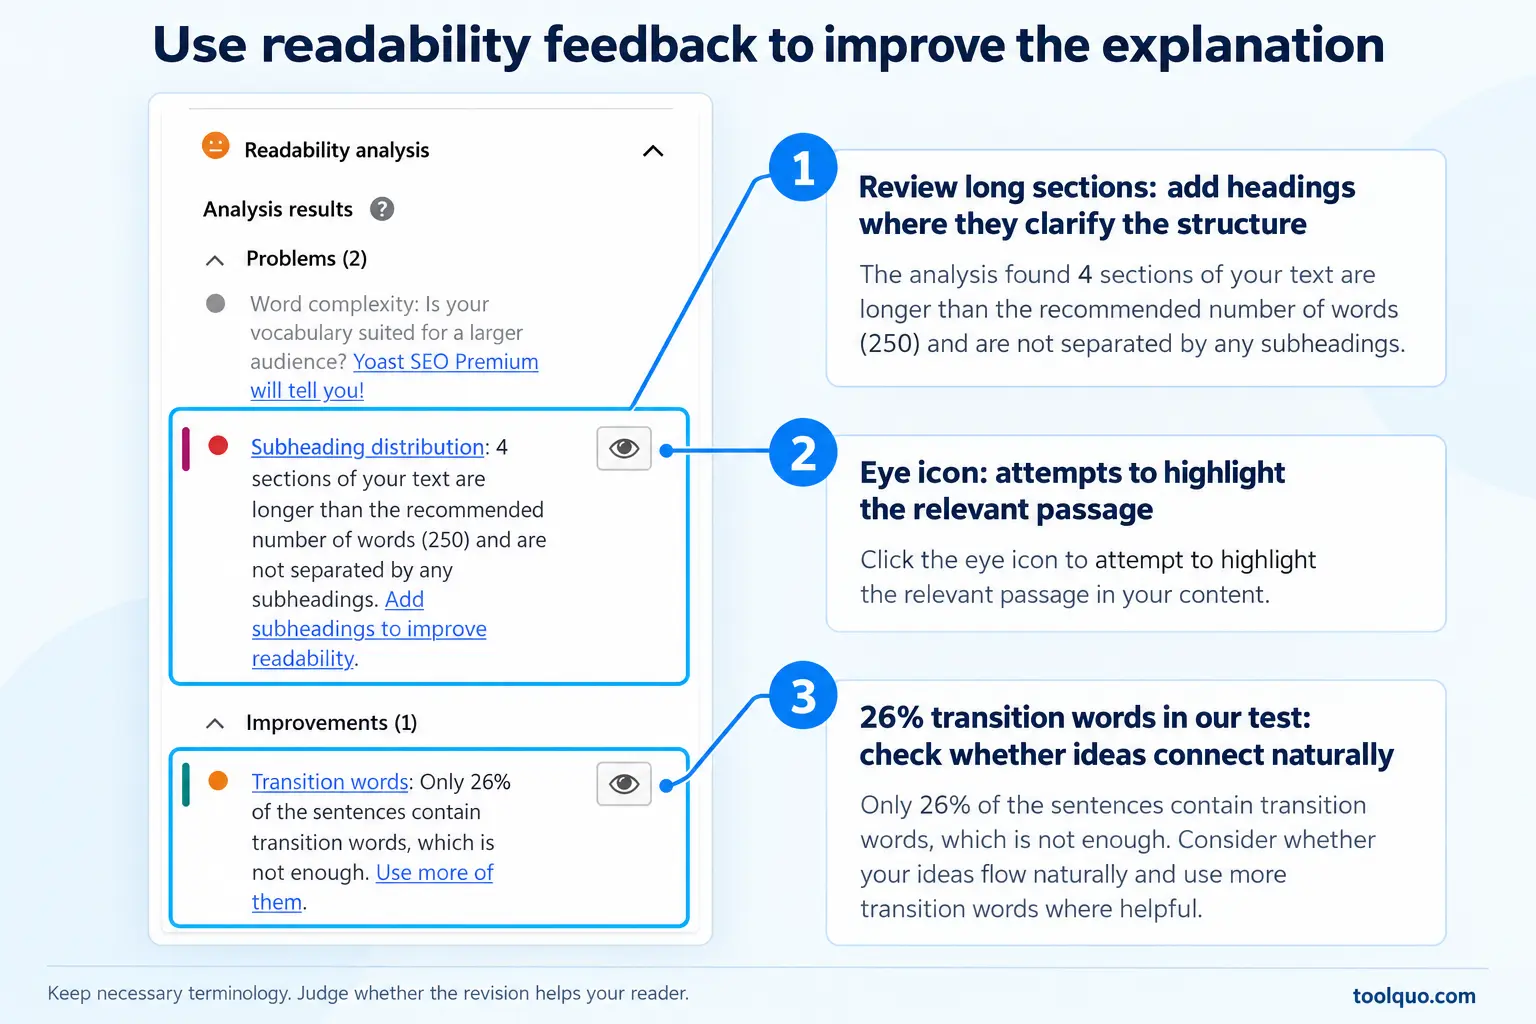
Available checks depend on language and plan. A locked Premium assessment is not a fault in Free. Some results have an eye icon that attempts to highlight relevant passages; click it and review the marked text where supported.
The highlighting controls did not produce a visible highlight in our test. If that happens, inspect the relevant passages manually from the assessment description and check editor compatibility if highlighting is important to your workflow.
Use practical revisions
Sentence length: divide a sentence when too many actions hide the point. Before: “Users who have installed the plugin and completed the configuration process should subsequently undertake a review of the settings that determine whether pages are available to search engines.” After: “After setup, check which pages search engines can access.”
Paragraph length: give each paragraph a main point. Split when the explanation changes direction, not simply after an arbitrary number of lines. On mobile, a dense block can be difficult to scan even when the sentences are individually clear.
Subheading distribution: use headings as meaningful landmarks. A section about submitting a sitemap and another about missing URLs help readers find the relevant task. Headings inserted merely to interrupt a word count do not improve the logical sequence.
Passive voice: prefer a direct construction when the actor matters. “The editor updated the description” is clearer than “The description was updated by the editor.” Passive voice can still fit when the actor is unknown or irrelevant, such as “The website was restored overnight.”
Transition words: show the actual relationship between ideas. Before: “The page is noindex. It is absent from the sitemap.” After: “The page is noindex, so its absence from the sitemap may be expected.” The improvement is the explained relationship, not the presence of a connector alone.
Our transition-word assessment showed 26%. We used it to inspect how ideas connected, rather than adding “moreover” and “however” to unrelated sentences. Treat other percentage thresholds with the same editorial judgment.
Understand reading ease and complexity
Flesch reading ease estimates difficulty using features such as sentence and word length. Higher values generally indicate easier reading. Yoast places this information in Insights rather than the main readability traffic-light checks.
Open Insights in the editor. If needed, review “Yoast SEO” → “Settings” → “Site features” → “Insights” and save the feature setting. Word complexity is separate paid feedback and can appear locked in Free.
Replace needlessly difficult expressions, but define terms your reader needs. “Canonical URL” can be appropriate in an SEO explanation; leaving it unexplained is the avoidable problem. Read the revised passage to check whether the concept is easier to understand, not just whether the indicator changed.
13. Add Useful Links and Manage Important Content
Link related articles and mark principal guides
Internal links connect pages on your own website. While editing, select a descriptive phrase, use WordPress’s link control and choose a destination that helps the reader at that point. A useful link can introduce a prerequisite concept or lead to a more detailed procedure.
Link from broad guides to relevant detailed resources and from supporting articles back to the main guide where helpful. Avoid adding the same link in every paragraph. The destination should match what the anchor text promises.
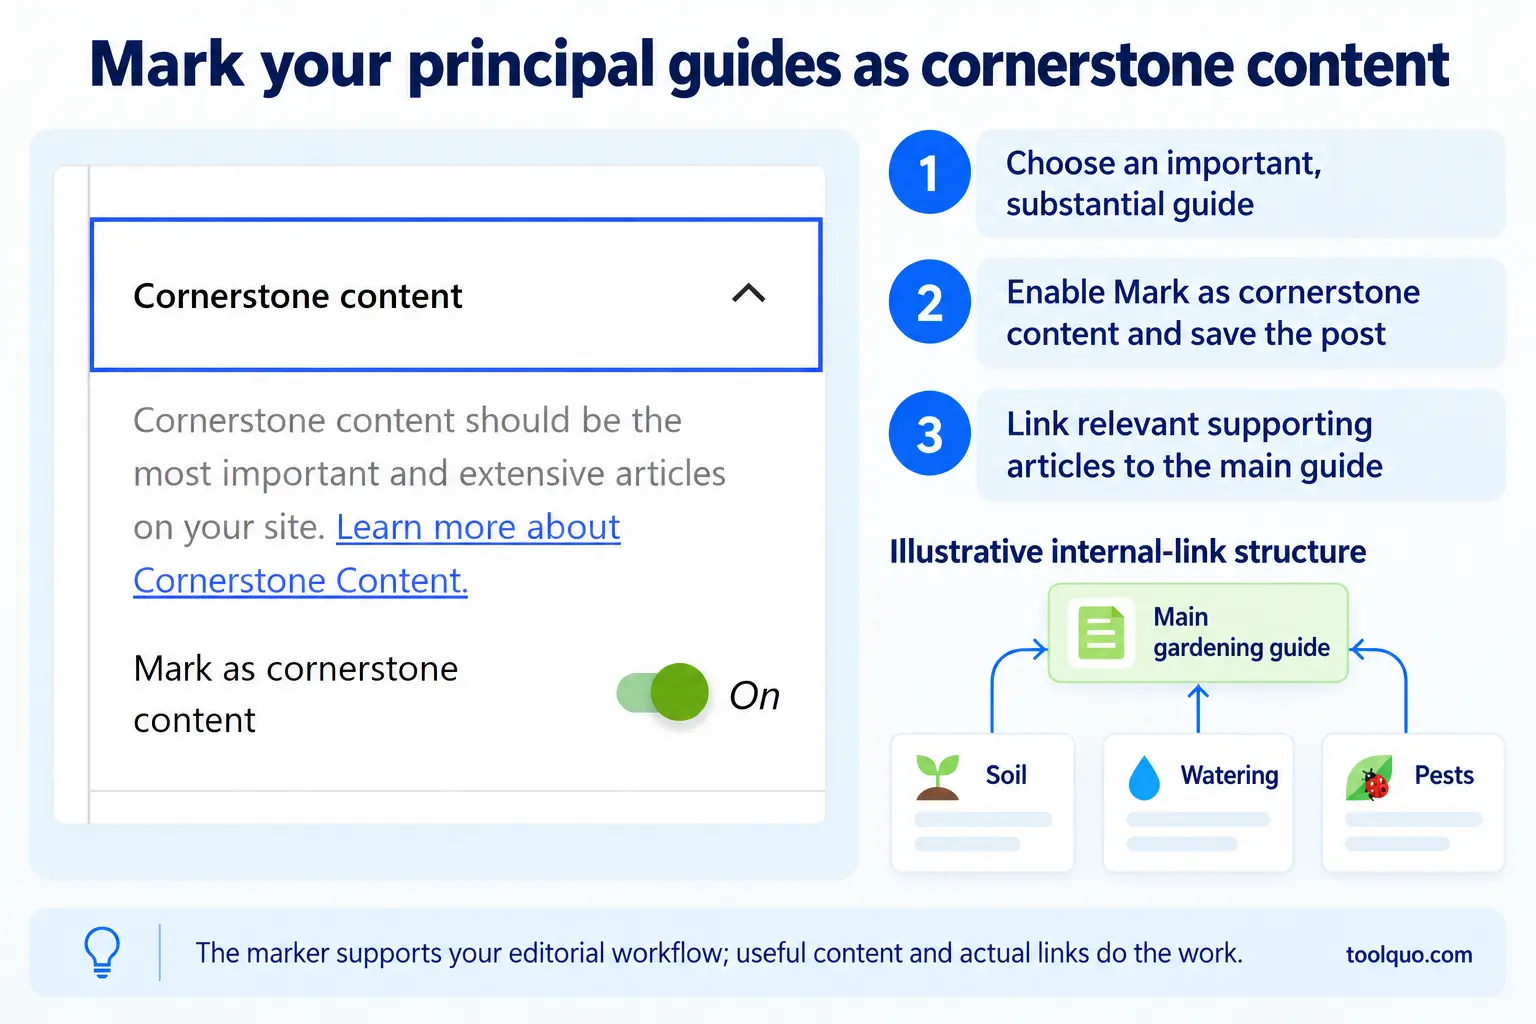
Cornerstone content identifies your most important substantial resources. For example, a Beginner’s Guide to Gardening could be supported by narrower articles about soil, watering and pests. Enable “Cornerstone content” under Site features if needed, then mark the principal article using its Yoast control and save.
Use the cornerstone filter in the posts overview to find those resources during maintenance. The marker supports an editorial workflow and relevant stricter analysis; your actual links, organization and content make the resource useful. Choose a few durable main guides rather than marking every post.
“Text link counter,” available under Site features, can help locate important articles with few incoming links. Inspect the actual content before acting on a count. Premium linking suggestions can assist, while Free users can select destinations and add links manually.
Optional: edit several items through the Bulk Editor
For a small number of articles, editing each item is straightforward. When refreshing many descriptions, open “Yoast SEO” → “Tools” → “Bulk editor.” Select Posts or Pages and use search or filters to find the relevant items.
Choose “Search appearance” for SEO titles and meta descriptions, or “Social appearance” for social titles and descriptions. Use Edit or the available multi-item controls, enter page-specific text and click “Save edits.” Reopen a sample item to verify that the fields persisted.
We saved a draft’s description and custom social title/description through the Free Bulk Editor. Paid AI generation is a separate feature. Work in small batches and give each page an appropriate summary; using the tool to repeat one generic sentence defeats the purpose.
Part IV — Configure Social Sharing
14. Choose Sharing Titles, Descriptions and Images
A shared-link card uses metadata supplied by the page. Open Graph provides information such as title, description and image to supporting platforms; X card data serves the corresponding purpose for X. This metadata is separate from the visible article text.
Open “Yoast SEO” → “Settings” → “Site features.” Keep “Open Graph data” and “X card data” enabled when Yoast is their intended provider. Slack sharing is optional additional presentation. Check for competing output if another component supplies the same metadata.
Choose a specific image for an important article and a suitable branded fallback in Site basics. At thumbnail size, the subject should remain recognizable and any essential text readable. Avoid an image whose meaning depends on a tiny screenshot or details cropped from its edges.
- Open the post’s Yoast “Social appearance” controls and review the available text and image fields.
- For custom social text through the tested Free route, open “Yoast SEO” → “Tools” → “Bulk editor” → “Social appearance.”
- Find the item, enter an accurate social title/description and click “Save edits.”
- Reopen the fields to confirm the values persisted. For a public URL, check the sharing output with the relevant platform’s debugging/refresh tool where available.
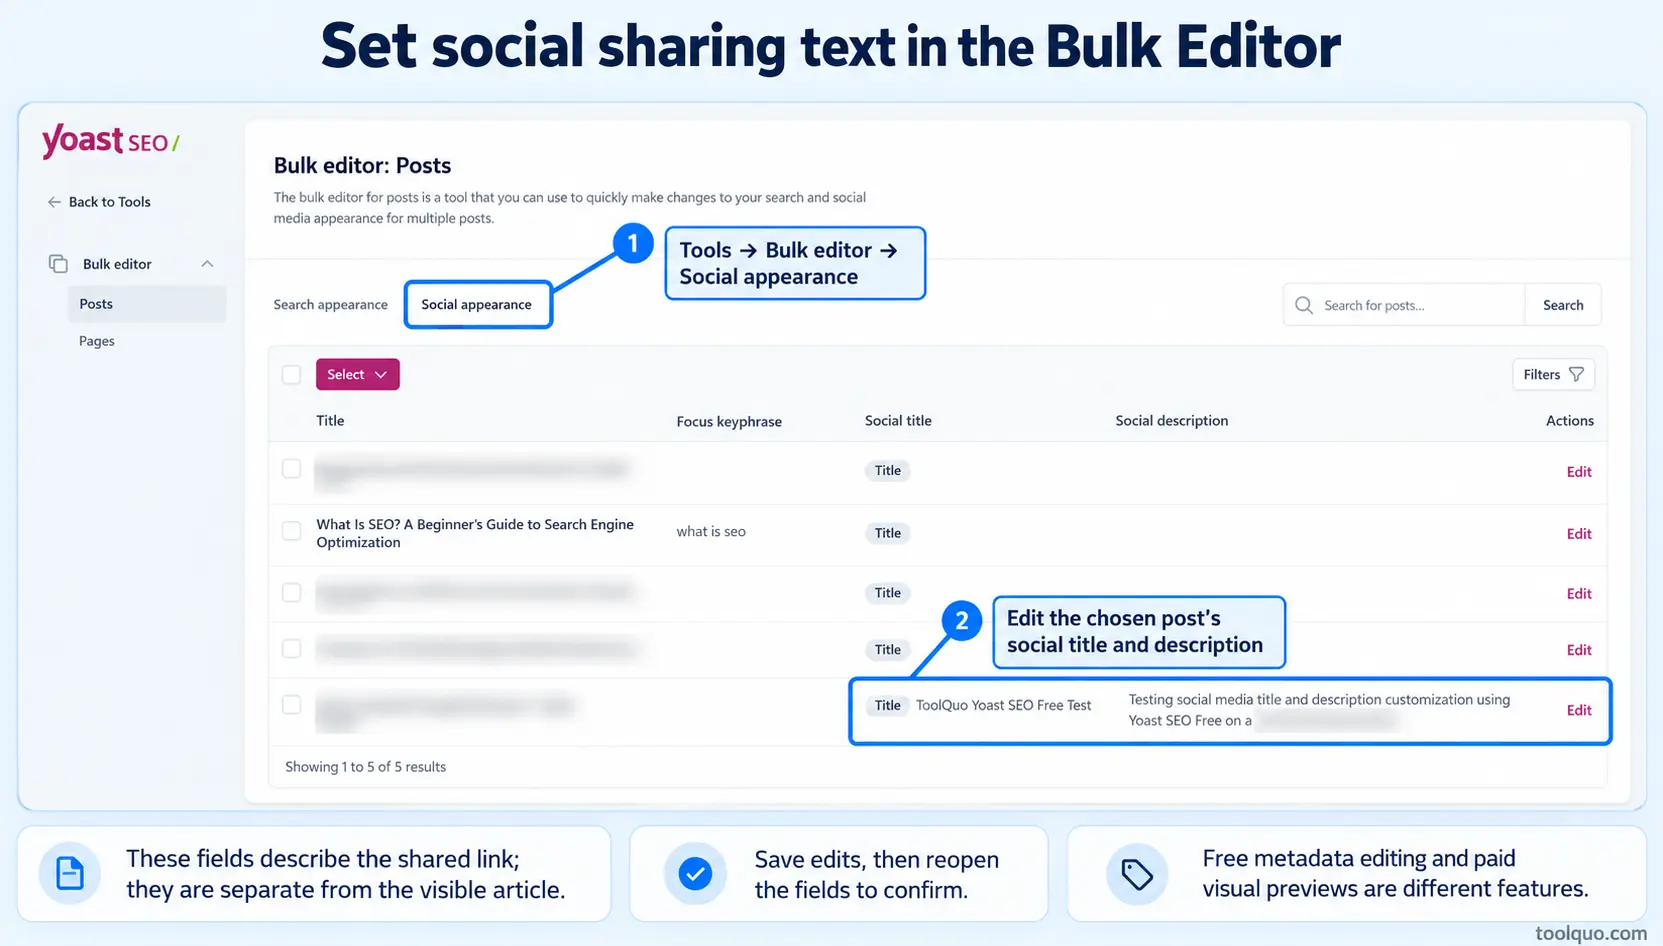
Free metadata editing, paid visual previews and social templates are different capabilities. A locked preview does not establish that all custom social fields are unavailable in Free. Our Bulk Editor test saved the text; it did not measure public engagement or guarantee a platform would refresh immediately.
For the SEO article, a search title can identify the beginner guide, while a social introduction can ask what happens between publishing a page and finding it on Google. Both must match the same article. Do not write a more dramatic promise than the content supports.
If a card remains old after saving, distinguish the website cache from the social platform’s cache. Confirm the saved fields and public image first, then request the platform refresh where supported. An unpublished draft cannot be inspected through an ordinary public sharing debugger.
Llms.txt and paid automation are optional extras, not prerequisites for this workflow. If you want to assess them, use our Yoast Review. Here, finish the core setup before adding another tool.
Part V — Verify and Maintain the Setup
15. Run the Final Setup Checklist
Use this once after completing the walkthrough on a representative article. Check the conditional items only when they apply to your website.
- Yoast is active, with overlapping general-purpose SEO output resolved.
- Site name, entity details and relevant images accurately identify the website.
- The public site has no unintended search discouragement or access restriction.
- Public content types and individual pages have appropriate visibility.
- Category, tag and author/date archive decisions match the resulting pages.
- The public sitemap opens and its important URLs have been checked.
- Schema describes the content and publisher accurately.
- Breadcrumb links work if you chose to display them.
- The homepage and representative article have useful saved titles and descriptions.
- The article’s readability, links and image descriptions have been reviewed.
- Social metadata is saved and checked where relevant.
- Required redirects were preserved during migration or a published URL change.
Preview a draft for visible content; open a published URL while logged out to check what visitors can access. If the page depends on a store, LMS or page builder, include a representative item from that system. Investigate a concrete failed check through Section 17 rather than retesting every feature.
16. Monitor Search Performance and Maintain the Configuration
Yoast’s analysis reports checks on the content it can inspect. Google Search Console reports what happened in Google Search. Use both for their respective purposes; a green editor result does not establish impressions, clicks or indexing.
In Search Console, open “Performance” → “Search results.” Filter to an important page and inspect relevant queries over a meaningful period. Are impressions appearing for the intended subject? Do people click? Is the article’s actual coverage suited to those searches?
Read average position alongside the page/query filters. It is an aggregated measure rather than one fixed rank for every user. Allow for seasonality and processing time before attributing a change to one edit.
Use URL inspection and the Page indexing report for an important page missing from results. Check its intended visibility and accessibility before changing the article solely to improve an editor indicator.
For a small site, a monthly review is a reasonable starting routine, with earlier checks after major changes. Update important facts and offers, inspect broken links and review meaningful alerts. After a theme, SEO-plugin or store/LMS change, recheck representative public URLs.
Wincher and Semrush integrations can support rank tracking or keyword research, but have separate account and plan requirements. We examined those interfaces rather than independently testing the connected data in this workflow. You can maintain the basic setup and use Search Console without connecting every service.
17. Common Yoast SEO Problems and How to Fix Them
Identify where the mismatch appears: the editor, saved public output, a cache or Google’s indexed version. These stages can show different information. Start with the relevant row below.
|
Problem |
Check first |
Next action |
|---|---|---|
|
Red or missing analysis |
Keyphrase, enabled analysis features and whether the editor exposes the content. |
Review the actual assessment; confirm supported editor integration. Save and reopen before assuming a plugin fault. |
|
Description appears missing or unchanged |
Correct item, saved field and public output. |
Save the intended value, clear relevant caches and check the public page. Google may choose a different snippet. |
|
Unexpected noindex |
WordPress Reading, content-type default and individual Advanced setting. |
Correct the unintended source and check the live URL in Search Console. |
|
Page missing from sitemap |
Publication status, correct child sitemap, visibility and canonical/redirect destination. |
Resolve that cause, then refresh relevant caches and inspect the sitemap again. |
|
Sitemap cannot be fetched |
Exact address and access without login or an anti-bot challenge. |
Check feature status, redirects, caching and security rules; retest the public XML. |
|
Breadcrumbs absent or duplicated |
Theme/block implementation and existing navigation. |
Use one supported display implementation and test representative pages. |
|
Wrong social image |
Saved image, public accessibility and platform caching. |
Correct the image/source, then refresh the platform’s cached preview where supported. |
|
Unexpected schema |
Which theme/plugins generate the relevant markup. |
Correct the inaccurate source and validate the resulting supported output. |
If a setting refuses to persist or output is duplicated, review overlapping plugin/theme features and reproduce the issue on an isolated test copy where possible. Make one controlled change at a time. Avoid deactivating a live store or access-control system to troubleshoot an unrelated indicator.
18. Remaining Questions and Your Next Article
Do I need every indicator to be green?
No. Use the specific results to inspect useful issues, then retain justified exceptions. The goal is an accurate, understandable page with suitable metadata and settings. A color cannot evaluate every aspect of expertise or usefulness.
Does the focus keyphrase tell Google what to rank?
It tells Yoast what to use for applicable assessments. Google evaluates the page through its own systems. Choose a phrase matching the article’s real purpose, then make the explanation helpful.
Is Yoast SEO Free Enough for WordPress SEO?
Yoast SEO Free supports the core WordPress SEO settings and editing tasks in this walkthrough. Consider paid tools when a specific workload justifies them, such as a preferred redirect-management or linking-assistance workflow. Core editing does not require every suggested external connection. Our Yoast SEO review examines the purchase decision.
What if my page builder is not fully analyzed?
Editor analysis depends on the content and integration available to the plugin. Check compatibility and the saved public page. Incomplete analysis is a reason to verify the output, not automatically a reason to rewrite good content.
What should I do next?
Repeat Sections 10–13 for your next important article: set useful metadata, improve the explanation, add relevant links, review readability and save. Revisit sitewide settings when the website’s structure or requirements change, and use actual search data to guide ongoing improvements.
About the author
Nikhil Bhardwaj
Founder & Editor, Toolquo
Nikhil leads Toolquo’s editorial direction, focusing on practical software research, transparent comparisons, and clear buying decisions.
View author profile →Keep exploring
Related guides
October 29, 2026
Yoast SEO Review (2027): How Good Is It, and Is Premium Worth It?
Our hands-on Yoast SEO review explores Free features, Premium pricing, strengths, limitations, and whether upgrading is…
October 23, 2026
Off-Page SEO: A Practical Guide to Backlinks, Link Building and Website Authority
Learn off-page SEO from scratch, including quality backlinks, eight proven strategies, free competitor research in Bing…
October 20, 2026
How to Use Rank Math SEO in WordPress: Complete Setup Guide (2027)
Learn how to install and set up Rank Math SEO, choose WordPress settings and modules, optimize…