Yoast SEO Sitemap: How to Find, Configure and Fix Errors (2027)
Find your Yoast SEO sitemap, choose which URLs belong in it, submit it to Google Search Console, and troubleshoot common errors with beginner-friendly steps.
On this page
Your Yoast XML sitemap is generated automatically. You do not normally need to create a file, upload it to your server or rebuild it after publishing an article.
This guide takes you from opening your sitemap to understanding its contents, choosing which pages to include, submitting it to Google and fixing common problems. Finding a URL is only the first step: Google must then visit the page (crawl it) and decide whether to add it to its search index. Being listed in a sitemap does not guarantee indexing or rankings.
If you are looking for specific information, use the table of contents to jump directly to the section you need.
1. How to Generate and Find Your Yoast SEO Sitemap URL
An XML sitemap is a machine-readable list of website URLs. Think of it as a directory for search engines, rather than the menu visitors use to navigate your site. Yoast’s sitemap generator is included in Yoast SEO Free. You do not need a paid subscription to generate or use its standard XML sitemap.
Enable XML sitemaps in WordPress
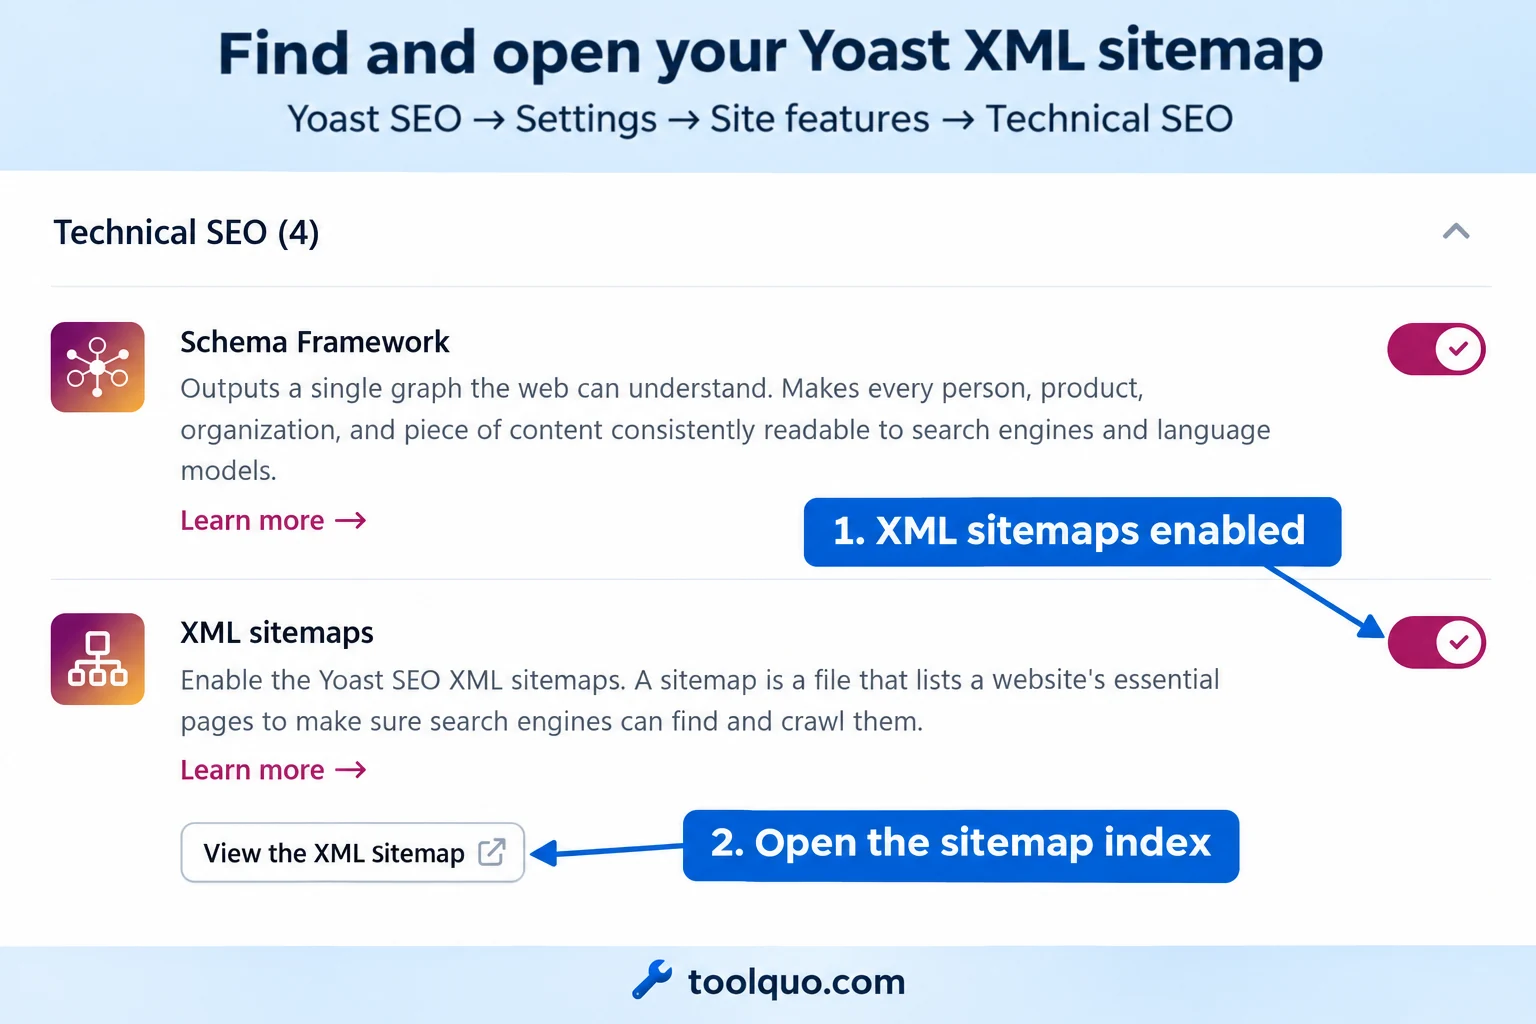
- Open your WordPress dashboard and select Yoast SEO → Settings.
- Open Site features and scroll to Technical SEO.
- Find XML sitemaps. Enable it if Yoast is the system you intend to use for sitemap generation; save changes if prompted.
- Select View the XML sitemap. Check the address that actually opens.
For a website installed at its main domain, the sitemap index is normally https://example.com/sitemap_index.xml. If WordPress is installed in a folder, such as example.com/blog/, or the site has a customized setup, the address may differ. Click View the XML sitemap in Yoast, then copy the full URL from your browser’s address bar. This gives you the sitemap address for your installation.
If you need the broader installation and configuration walkthrough, see our How to Use Yoast SEO guide. This article concentrates on sitemaps.
Yoast sitemap versus WordPress sitemap
WordPress has a built-in sitemap at /wp-sitemap.xml. Yoast documents that enabling its XML sitemap feature disables the default WordPress sitemap. Turning Yoast’s feature off does not itself disable the core alternative.
The address /sitemap_index.xml is also used by other plugins, including Rank Math. To identify the generator, check your active plugin settings and any generator information in the XML or its displayed page. The filename alone is not proof.
WordPress’s built-in sitemap is sufficient for basic URL discovery, but if you already use Yoast or Rank Math, the plugin’s sitemap is usually the more practical choice because it works with that plugin’s search-visibility settings. You do not need to install an SEO plugin solely to replace a working WordPress sitemap.
Sources: Yoast sitemap guide · Site features.
2. Understand Your Sitemap Index and Listed URLs
When you open sitemap_index.xml, you will usually see a list of links ending in .xml. This is the sitemap index: a directory of smaller files called child sitemaps. Click one of those links to see the actual page addresses it contains. For example, post-sitemap.xml normally lists blog articles, while page-sitemap.xml lists WordPress pages such as services or About.
Lists child files
sitemap_index.xml
Lists page addresses
post-sitemap.xml
The content itself
example.com/seo-guide/
Yoast groups content into these child files so different kinds of pages can be listed separately. You may also see files for categories, tags, authors or products. A category archive is a page that collects posts in one category, such as all your SEO tutorials. Which child files appear depends on your website’s content and settings.
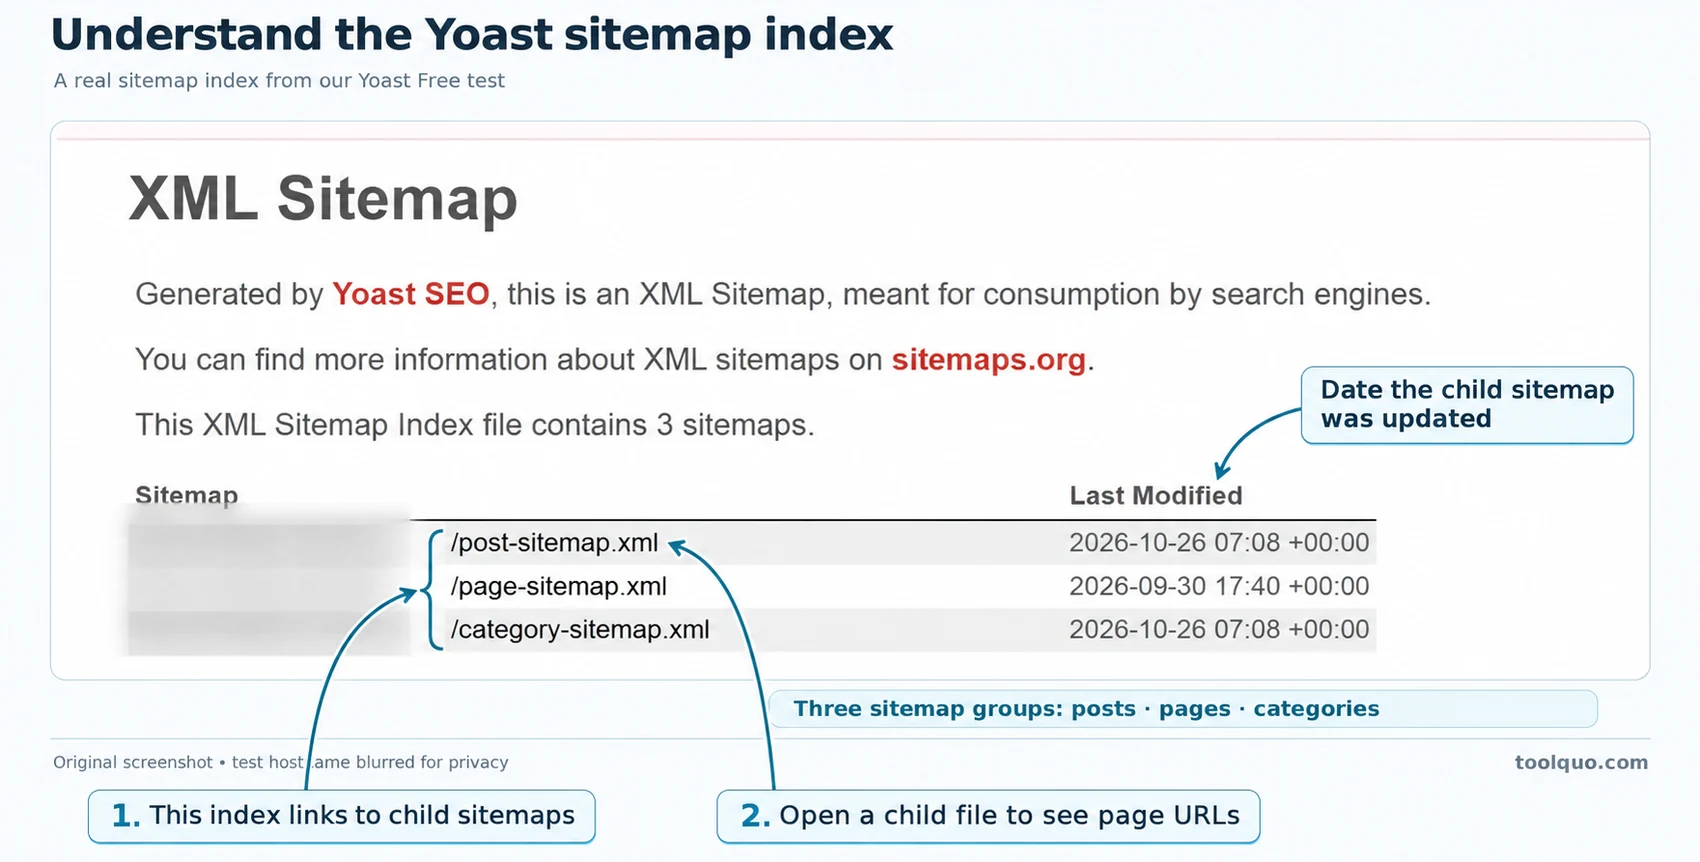
The table below explains the child sitemaps you may see and the kinds of pages to look for when you open each one.
| Sitemap | What to inspect |
|---|---|
| Post / page | Published articles or pages allowed into the sitemap by your site settings. |
| Category / tag | Category or tag archive pages allowed into the sitemap, such as a collection of SEO articles. |
| Author | Author pages allowed into the sitemap, usually listing a writer’s posts. |
| Product / custom type | Product pages or other content types added by a store or another site feature. |
Now open a child sitemap and look for two or three important published pages. If a page is missing, Section 5 explains what to check. This extra step matters because an index can open successfully even when one child file or an expected page needs attention.
What do URL, Images and Last Modified mean?
After clicking a child sitemap, you will usually see a table with one page address per row. In Yoast’s browser view, the main columns are URL, Images and Last Modified. You can read this table without opening or editing XML code.
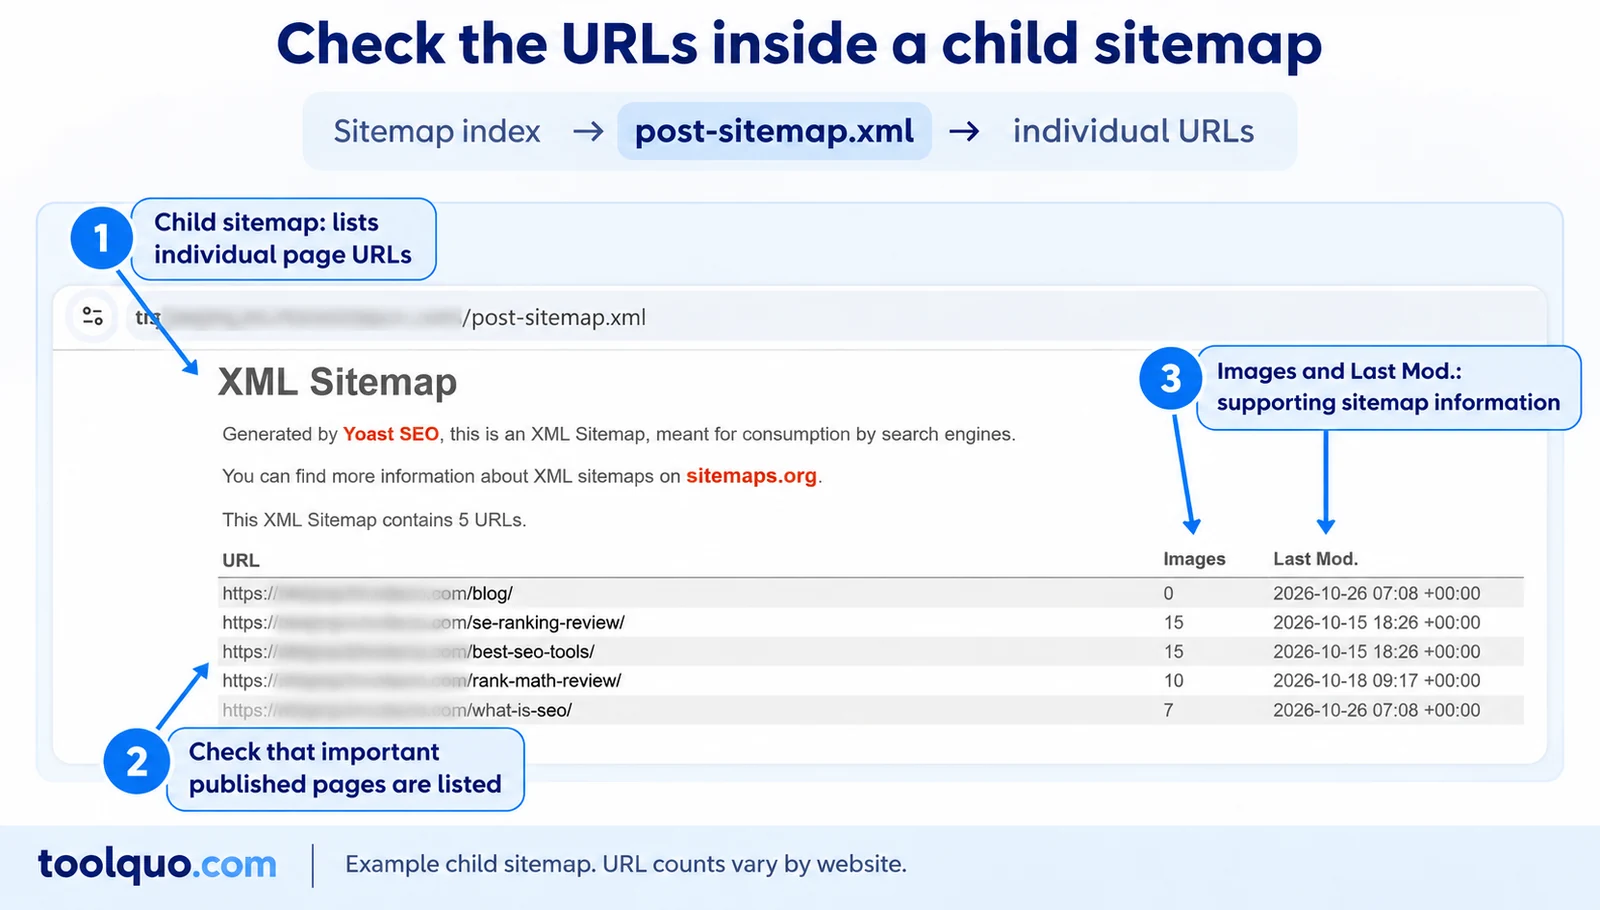
URL is the full address of the listed page, such as https://example.com/seo-guide/. Images is the number of image entries Yoast has associated with that page in the sitemap. It does not tell you how many of those images Google has indexed. Some images added through page builders may not be detected automatically, so this count may differ from the number you see in the article.
Last Modified tells you when the listed page was last updated. Google can use accurate update dates to help decide when to visit it again; simply changing a date is not a shortcut to higher rankings. On the index screen, the date beside a child sitemap refers to that file’s update time. Inside the child file, the date beside a page refers to the page itself.
For example, a row for https://example.com/seo-guide/ with an image count of 3 indicates three image entries associated with that page in the sitemap. It does not establish that Google has indexed the page or those images.
Sources: Sitemap customization · Image entries · Google lastmod guidance.
3. Configure Yoast SEO Sitemap Settings
To decide which content to include in your website’s sitemap, ask: would this page be a useful result for someone finding my website through Google? A detailed article, service page or product page usually has a reason to appear in search. A form-submission confirmation page usually does not: it is meant for people who have just completed the form. The table below gives starting points for common types of content.
| Content or website | Practical starting approach | Reason |
|---|---|---|
| Blog or review site | Include important articles and useful pages. | Supports discovery of intended search content. |
| Business website | Include services, products and useful information pages. | These can serve distinct customer needs. |
| Online store | Include product and category pages that help shoppers choose. Review automatically generated pages before including them. | A product description or useful product collection can answer a search need; a repetitive filter page may add little. |
| Categories, tags and authors | Include archives with a clear topic and a useful collection. Evaluate repetitive or nearly empty archives. | For example, a category collecting ten helpful SEO tutorials can be useful; a tag repeating one article may not need a separate search result. |
| Private or utility content | Keep confidential pages behind access controls. Consider noindex for public utility pages, such as form-confirmation pages. | People should reach a confirmation page after taking an action; private information needs protection beyond search settings. |
Choose whether groups of posts, pages or archives appear
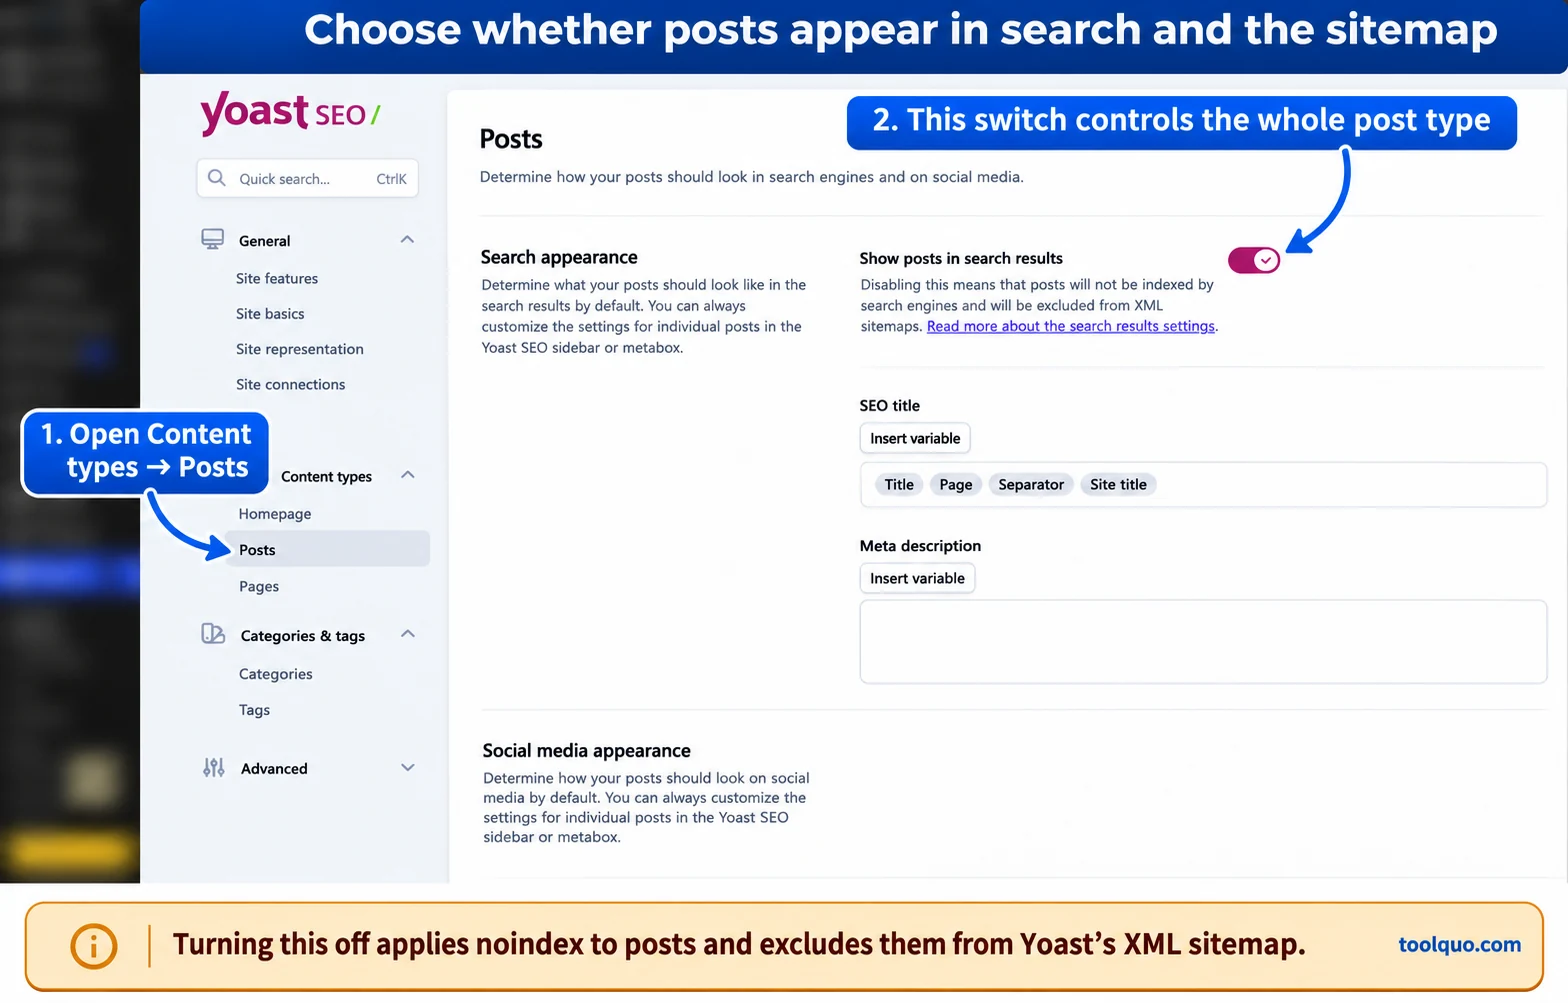
Once you have decided which types of pages should be discoverable in search, use Yoast’s settings to apply that choice. Under Yoast SEO → Settings → Content types, open Posts, Pages or another relevant type. To manage category or tag archives instead, open Categories & tags. Find Show [type] in search results, choose the intended setting and save.
For category and tag archives, look at the page a visitor would actually open. Does it bring together useful material on one clear topic? Is it meaningfully different from your blog listing or another archive? If yes, including it may make sense. If it is nearly empty or simply repeats another collection, consider improving it, consolidating it or using noindex. Noindexing the category archive itself does not automatically noindex the articles assigned to it.
Exclude one page from search results and Yoast’s sitemap
- Edit the relevant post or page in WordPress.
- Open the Yoast SEO sidebar or metabox and expand Advanced.
- Under Allow search engines to show this content in search results, select No if this page should not appear in search results.
- Update the content, then reopen the appropriate child sitemap to check the result.
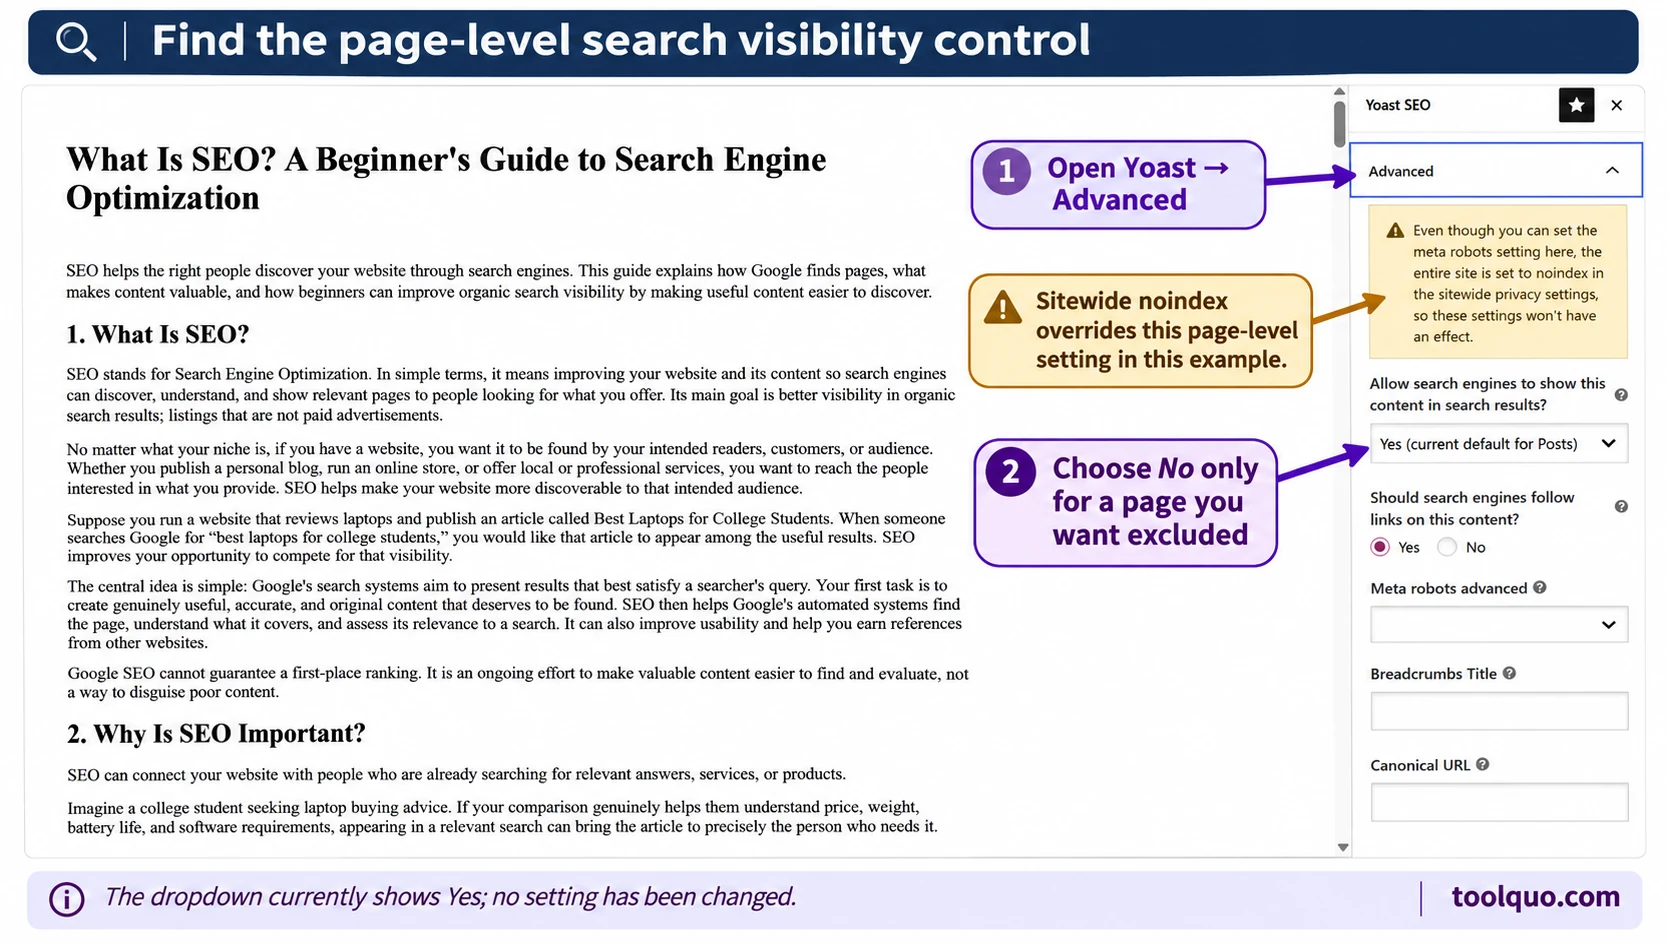
Noindex is also not a privacy control. Confidential content needs appropriate access protection. For the broader distinction between crawling, indexing and ranking, see What Is SEO?
Decide whether author pages belong in the sitemap, and check duplicate URLs
An author archive is a page listing posts by one writer. It may deserve a place in search and the sitemap if it helps readers explore that person’s work, particularly on a publication with several writers. If a single-author archive largely repeats the main blog listing, it may offer little separate value. This is a decision about whether that archive should be indexed, not whether the author’s individual articles should be indexed.
To apply that choice, open Yoast SEO → Settings → Advanced → Author archives. Enabling the archive makes the page available; allowing it in search results determines its search visibility and affects author-sitemap inclusion. These are separate controls. Excluding an author archive does not mean excluding all of that writer’s articles.
Another setting to check is the canonical URL: the preferred main address when similar content exists at more than one URL. For example, a printable version may identify the original article as its canonical. Yoast excludes a post or page from its sitemap when a manually entered canonical points away from its default address. If you find that setting, check why it was added before changing it; the original article may be the version intended for search.
Sources: Content exclusion · Author sitemaps · Sitemap specification.
Our Yoast SEO Review covers the plugin’s wider strengths and limitations.
4. Submit Your Sitemap to Google Search Console
Once your sitemap contains the pages you want search engines to discover, tell Google where to find it through Google Search Console, Google’s free website search-monitoring service. Submit the sitemap index address, not each page address. Google can follow the index’s links to the child sitemaps.
- Sign in to Google Search Console and select your website. A property is the website or website version tracked by Search Console. If you have not added yours yet, complete Google’s ownership-verification steps first. For a URL-prefix property, choose the version matching your site, including https:// and whether it uses www.
- Open Sitemaps in the sidebar.
- Under Add a new sitemap, enter the correct address. If the form already supplies the site prefix, enter sitemap_index.xml; for a domain property, use the full URL.
- Click Submit, then inspect the sitemap’s report for processing status and any reported errors.
- To check a particular page later, use URL Inspection: paste that page’s full address into Search Console’s inspection bar. The Page indexing report gives a broader view of which pages Google has indexed and reasons others are excluded.
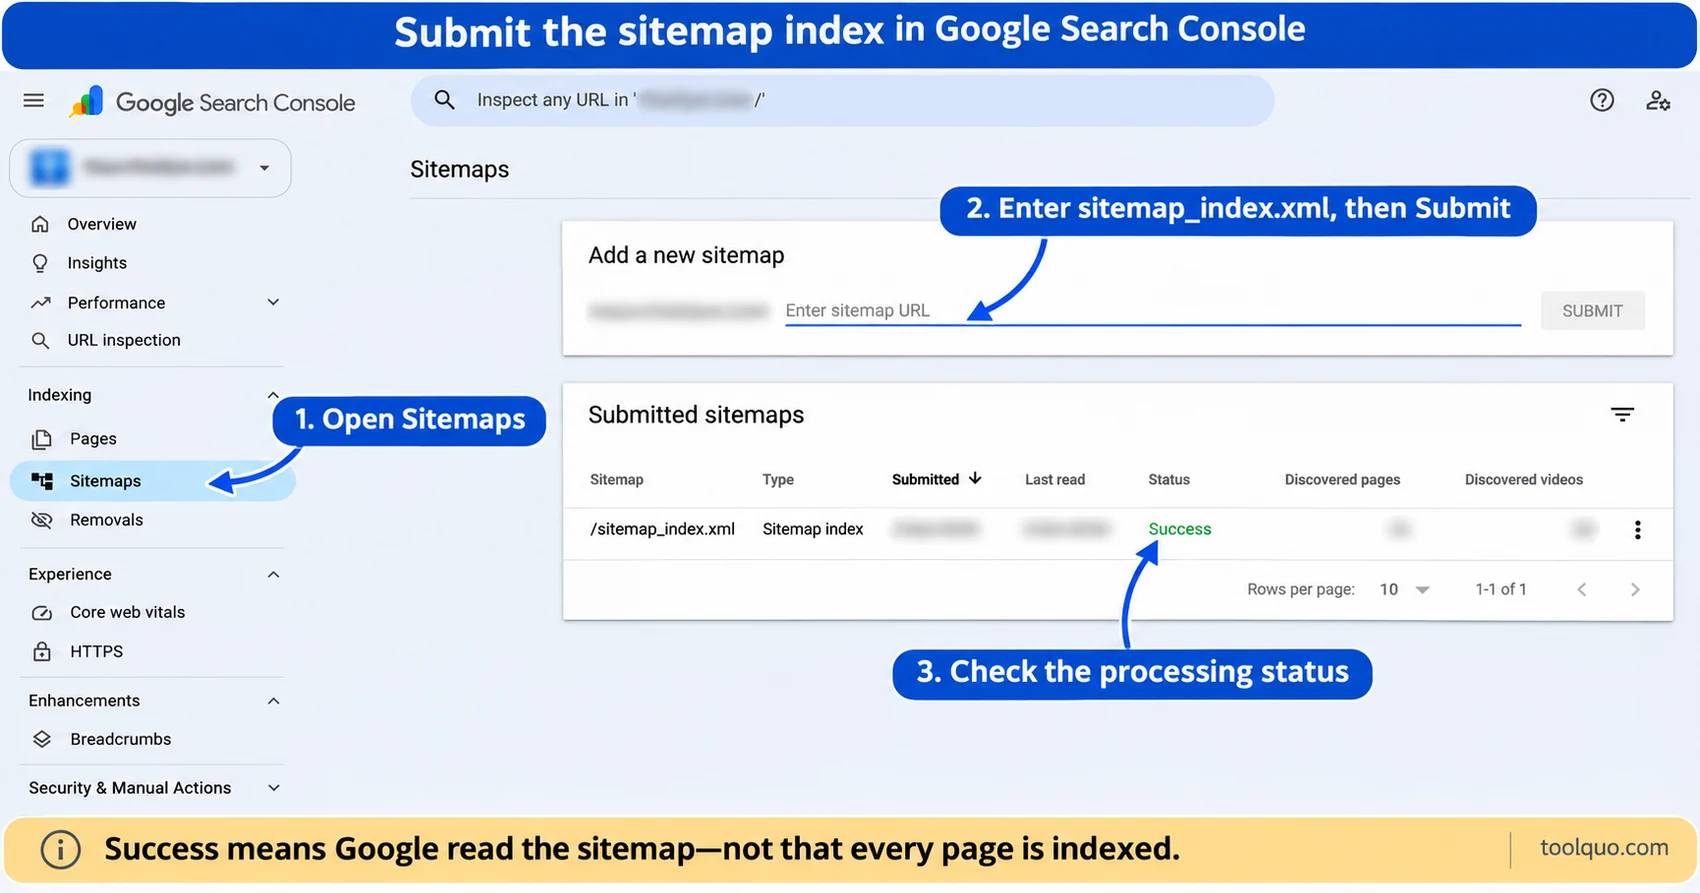
You do not normally resubmit the same unchanged sitemap address after every article. Yoast maintains the contents automatically. If the address changes or Google reports a persistent fetch problem, investigate and submit the corrected address as appropriate.
Sources: Google Sitemaps report · Submission instructions.
5. Yoast Sitemap Not Working? Diagnose the Symptom
Start by matching what you see to the table below: does the sitemap address fail to open, does a page seem to be missing from the list, or does Search Console report a problem? These have different causes. Note the exact address and error message first, then follow the matching explanation below.
| Symptom | Possible cause | Safest first check |
|---|---|---|
| 404 | Wrong address, disabled sitemap feature or a server URL-handling problem. | Open the index and affected child separately. |
| Blank or XML error | Display failure or unexpected response output. | Inspect source and the exact error. |
| Missing page | Publication status, search-visibility or preferred-URL settings. | Check that the page is published and allowed into the relevant child sitemap. |
| Stale entries | An older cached response. | Identify the cache serving that response. |
| Unwanted URL | A public page is still allowed into the sitemap by the current settings. | Identify the page type and decide whether it should appear in search. |
| Cannot fetch | Access restriction, wrong URL or server failure. | Read Search Console details and test public access. |
| Wrong domain or protocol | Site-address or migration configuration. | Compare intended URLs with actual output. |
| Unexpected generator | Another generator, redirect or physical file. | Check which plugin or file is generating the sitemap you opened. |
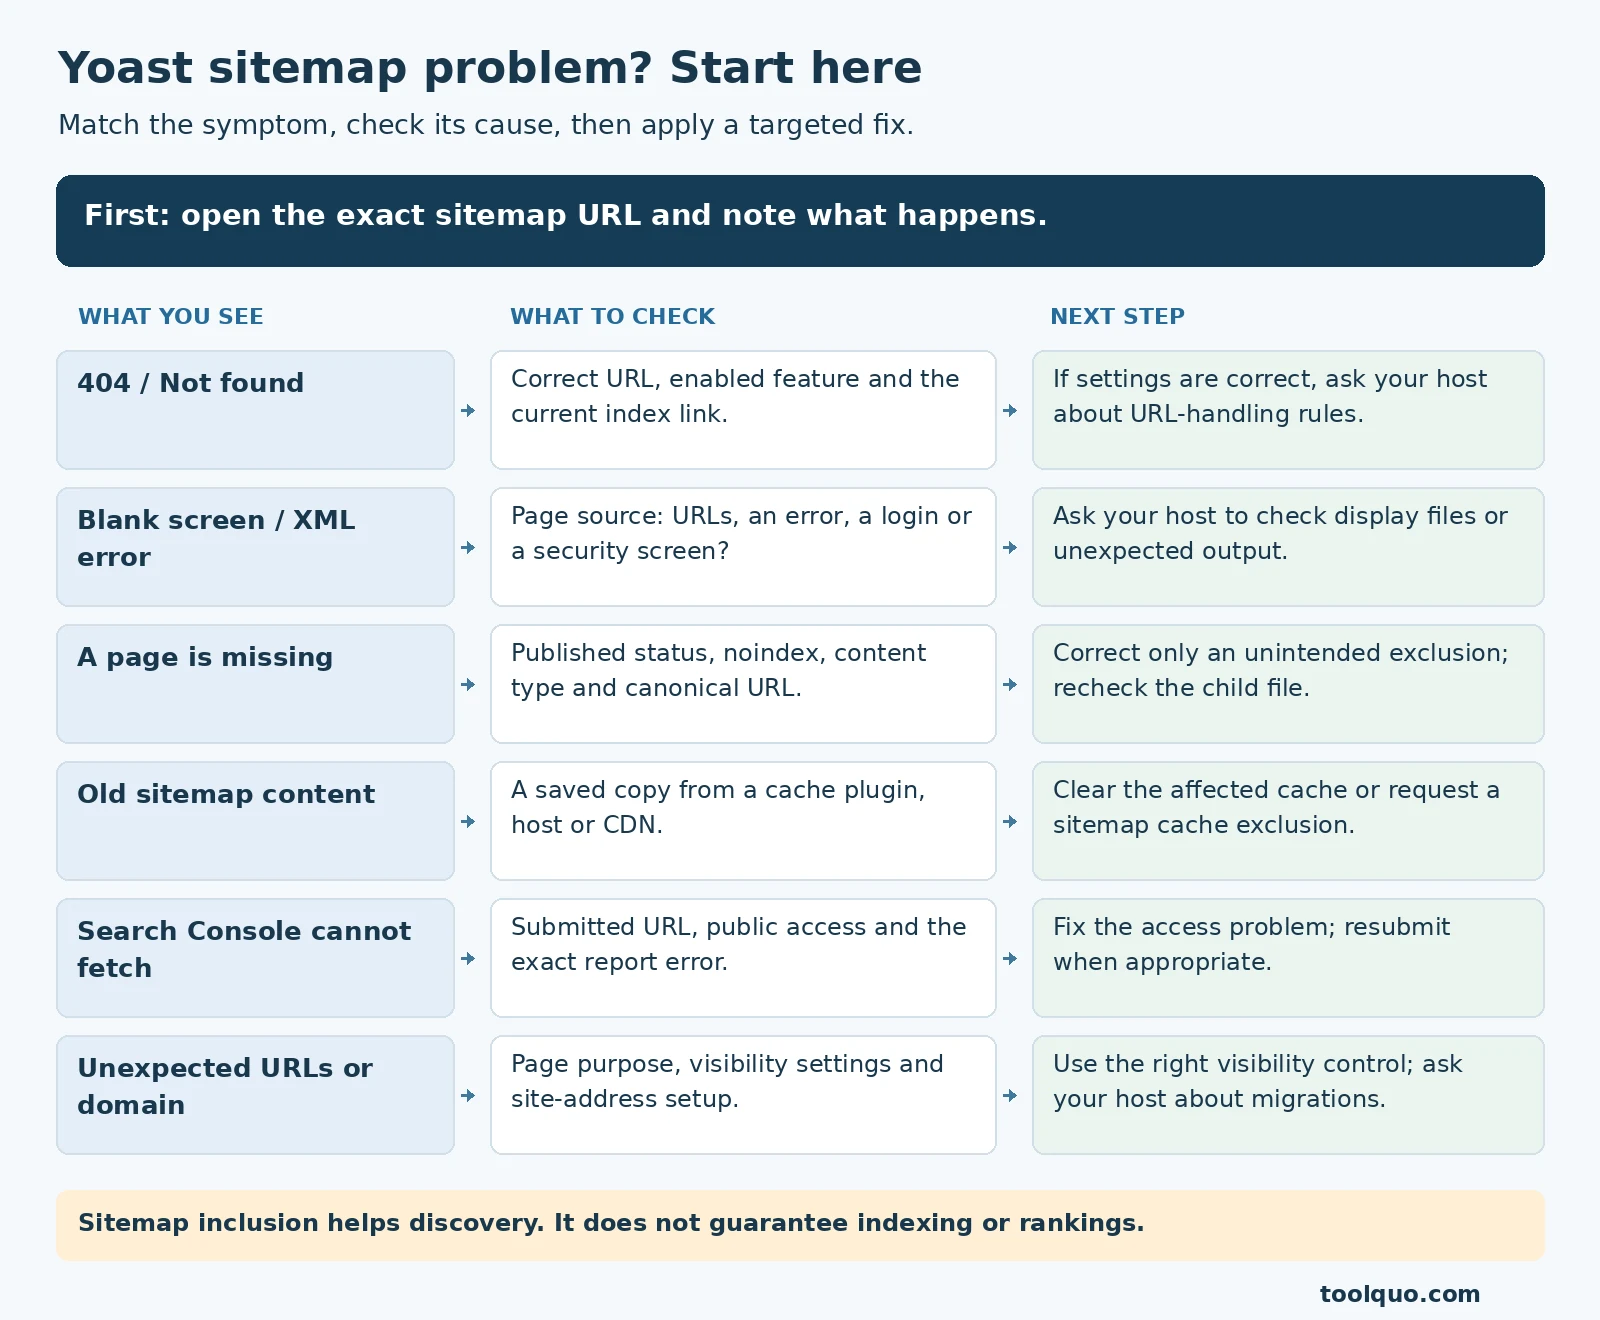
Yoast Sitemap 404 Error: Address Not Found
A 404 means the requested address was not found. Check the exact URL and confirm XML sitemaps is enabled. If the index opens but a child file does not, check whether that file is still linked from the current index and whether its content type has any published pages allowed into the sitemap. An old or mistyped child address can fail even when the main sitemap works.
If the address and settings are correct, the server may not be directing sitemap requests to WordPress correctly. One documented troubleshooting step is Settings → Permalinks → Save Changes without changing any values. This refreshes WordPress’s URL-handling rules. If the problem continues, ask your host to check its server configuration; do not change your page-address structure to solve this error.
Blank display, empty sitemap or XML error?
A blank screen does not always mean the sitemap contains no URLs. The browser may be failing to display it. A table with headings but no rows is different: the file may have no matching content. An XML error message means the browser found a problem reading the file’s underlying format.
To distinguish these cases, open the sitemap and use your browser’s View page source option, often available through a right-click menu. You do not need to understand all the code. Look for page addresses, an error message, or an unexpected login or security-check page. If addresses are present but the screen stays blank, ask your host or developer to check the XSL stylesheet, the file that makes the XML readable in a browser. If an error appears, send them the exact wording and sitemap URL.
Published page missing, or unwanted URL included
For a missing page, first check the right domain and child file, including numbered files such as post-sitemap2.xml. Then confirm the page is published, review its individual and content-type search-visibility settings, and check its canonical URL. A redirect, which sends visitors to a different address, or a developer’s exclusion rule may also explain the omission. The question here is whether the URL belongs in the sitemap, not whether Google has indexed it.
For an unwanted URL, open it and identify what it is: an article, a category collection, an author page or something added by another plugin. Apply the same principle from Section 3. A useful collection of tutorials may belong; a form-confirmation page usually does not. If you choose noindex, Yoast normally removes it from the sitemap too. Removing a URL only from the sitemap is different and does not instruct Google to remove an existing search result.
Yoast Sitemap Not Updating or Showing the Wrong Addresses
If a new article or edit does not appear in the sitemap, you may be seeing a cached copy: a saved older version used to serve requests faster. That copy could come from a WordPress cache plugin, your host or a CDN, a network that delivers site files. Check which service caches the affected sitemap URL, then clear that copy or ask its support team to exclude sitemap responses from caching. Reopen the sitemap to confirm the change before trying another fix.
If the sitemap lists an old domain or the wrong HTTP/HTTPS or www version, compare those addresses with your current public website. In WordPress, Settings → General shows WordPress Address and Site Address. The former can point to the software’s location and the latter to the visitor-facing site, so they are not always identical. If you are unsure, ask your host to check the setup and any recent migration before changing these values.
Search Console cannot fetch the sitemap
“Couldn’t fetch” means Google could not retrieve the sitemap. Open the error details and check the submitted address. Then open the sitemap in a private browser window without signing in to WordPress. If you see a login screen, security challenge or server error, that helps explain why Google may be unable to read it. Your host can also check whether security rules or robots.txt, the file containing crawler instructions, block access.
Google recommends a live URL inspection to test whether it can fetch the address; check the Page fetch result. If you or your host notices a noindex HTTP header on the sitemap itself, do not confuse it with noindex on an article. A header is information sent with the server response. Yoast uses this one to keep the XML file itself out of search results; Google can still read it as a sitemap.
Finally, compare the current test with the report’s Last read date, which records when Google last retrieved the sitemap. A previous failure may not describe the response you see now. If the problem persists, give your host the exact URL and error so they can check server records. After an actual fetch problem is fixed, resubmit the sitemap if needed.
Check for another generator or physical sitemap
If the sitemap looks different from what Yoast should generate, check whether another sitemap plugin or a manually uploaded sitemap file is serving that address. Having two sitemap addresses does not, by itself, prove a conflict. Ask your host or developer to identify the source before disabling a generator or removing a file. Back up any verified conflicting file before removal.
Sources: 404 troubleshooting · Blank sitemap troubleshooting · Common errors · Update troubleshooting · Google Sitemaps report.
6. Frequently Asked Questions
Is the Yoast SEO sitemap generator free?
Yes. Standard XML sitemap generation is included in Yoast SEO Free. You do not need Yoast Premium or a paid subscription to use it.
Do I need to regenerate the sitemap manually?
Normally, no. Yoast updates the sitemap as you publish, edit or remove content. If it stays outdated, follow the caching checks in Section 5 first. Disabling and re-enabling XML sitemaps is a documented reset option for a genuine update problem, rather than a step needed after every post.
Can I download or export the Yoast sitemap?
You can save an XML response from your browser for inspection. Saving the index does not download every child sitemap. Google Search Console needs the accessible online URL, rather than a downloaded file uploaded to Google.
Can I edit sitemap_index.xml directly?
Yoast creates the sitemap automatically when it is requested, rather than expecting you to maintain an XML file. Use the settings in Section 3 to change which content appears. A developer can handle unusual requirements through supported customization options.
Is an XML sitemap the same as an HTML sitemap or shortcode?
No. An XML sitemap is a list for search engines. An HTML sitemap is a normal web page containing links for visitors. A shortcode is a WordPress placeholder that inserts something into a page; you do not need one to enable or submit Yoast’s XML sitemap.
Why does Yoast show several or numbered sitemaps?
Yoast can group pages by type and split a large list into numbered files. For example, post-sitemap.xml and post-sitemap2.xml can hold different parts of the article list. Open the index and follow its links rather than guessing the filenames.
About the author
Nikhil Bhardwaj
Founder & Editor, Toolquo
Nikhil leads Toolquo’s editorial direction, focusing on practical software research, transparent comparisons, and clear buying decisions.
View author profile →Keep exploring
Related guides
November 1, 2026
How to Use Yoast SEO: Complete Beginner’s Guide (2027)
Learn how to install and configure Yoast SEO, choose WordPress SEO settings, optimize a post, and…
October 29, 2026
Yoast SEO Review (2027): How Good Is It, and Is Premium Worth It?
Our hands-on Yoast SEO review explores Free features, Premium pricing, strengths, limitations, and whether upgrading is…

October 23, 2026
Off-Page SEO: A Practical Guide to Backlinks, Link Building and Website Authority
Learn off-page SEO from scratch, including quality backlinks, eight proven strategies, free competitor research in Bing…